
Finding the right file before an audit used to mean hunting through registers one by one. The new Files Register gives you a single, searchable inventory of files across your iGRC registers, with version history, expiry tracking, and links to the controls and tests each file supports.
One register for your iGRC files. Attachments and uploads made to your iGRC registers, Controls, Tests and Tasks, including evidence shared through a Hailey chat, automatically create a Files Register record. You can add files directly in the formats your evidence is supplied in, e.g., documents, spreadsheets, presentations, images, audio and video. You will find the Files Register under Registers. Files attached to other custom registers are not captured at this time but this functionality is on our roadmap.
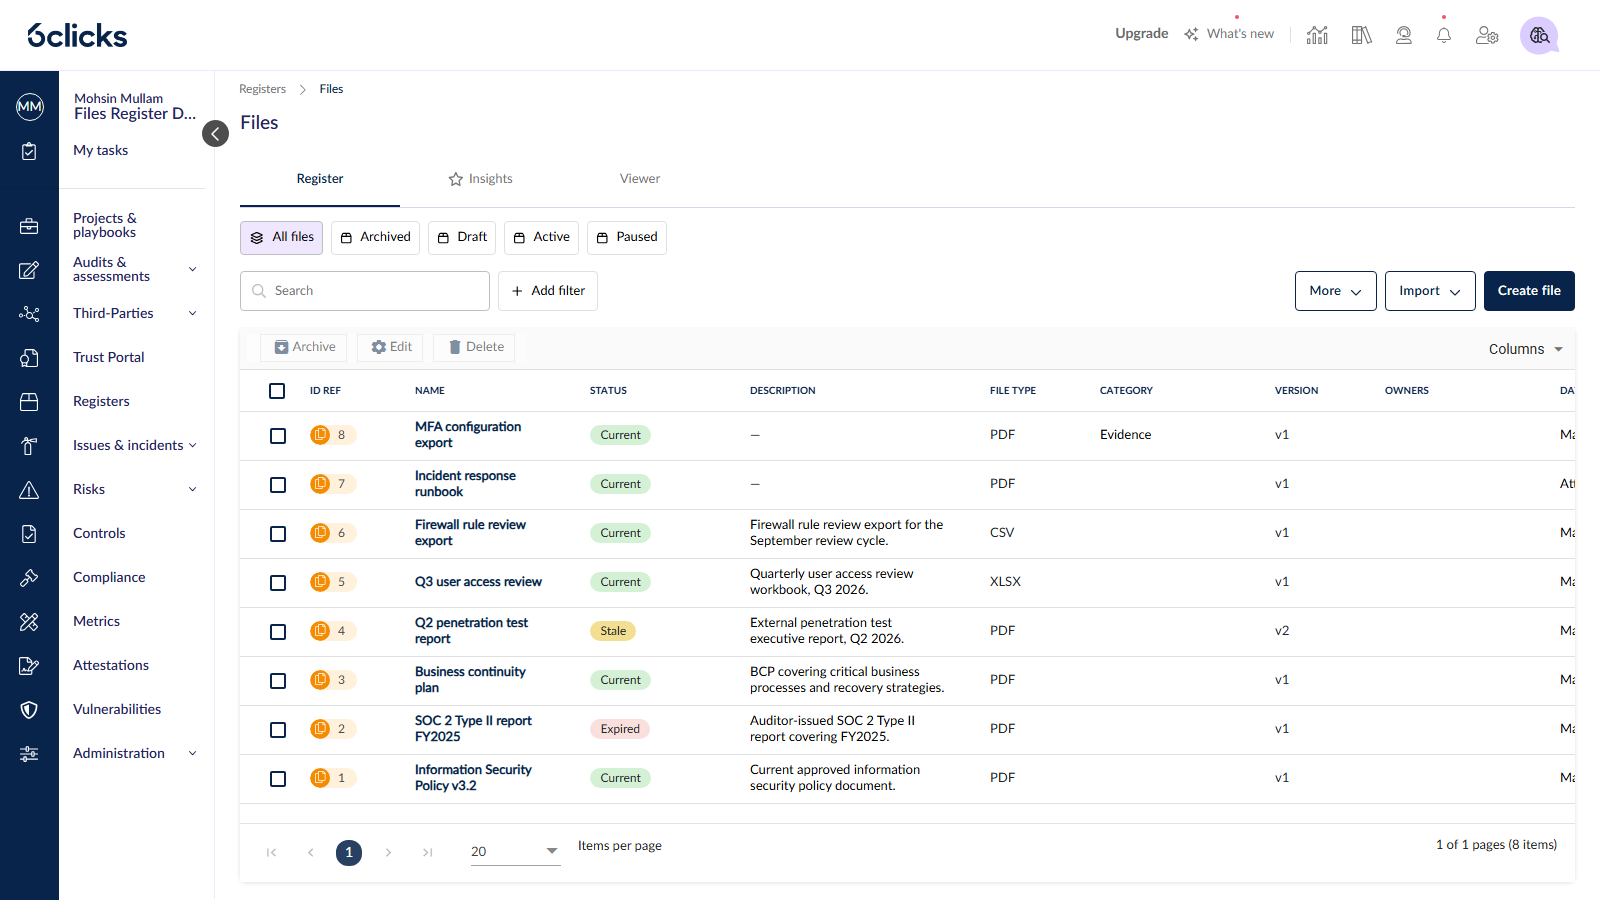
Freshness at a glance. Valid from and Expiry dates on each record drive the Status column, which shows every file as Current, Stale or Expired, so you see what needs to be replaced or updated before an auditor asks.
Version history on every record. Replace a file and earlier versions are kept, giving you a clear trail of what existed and when. View and manage past versions from the record's Versions tab.
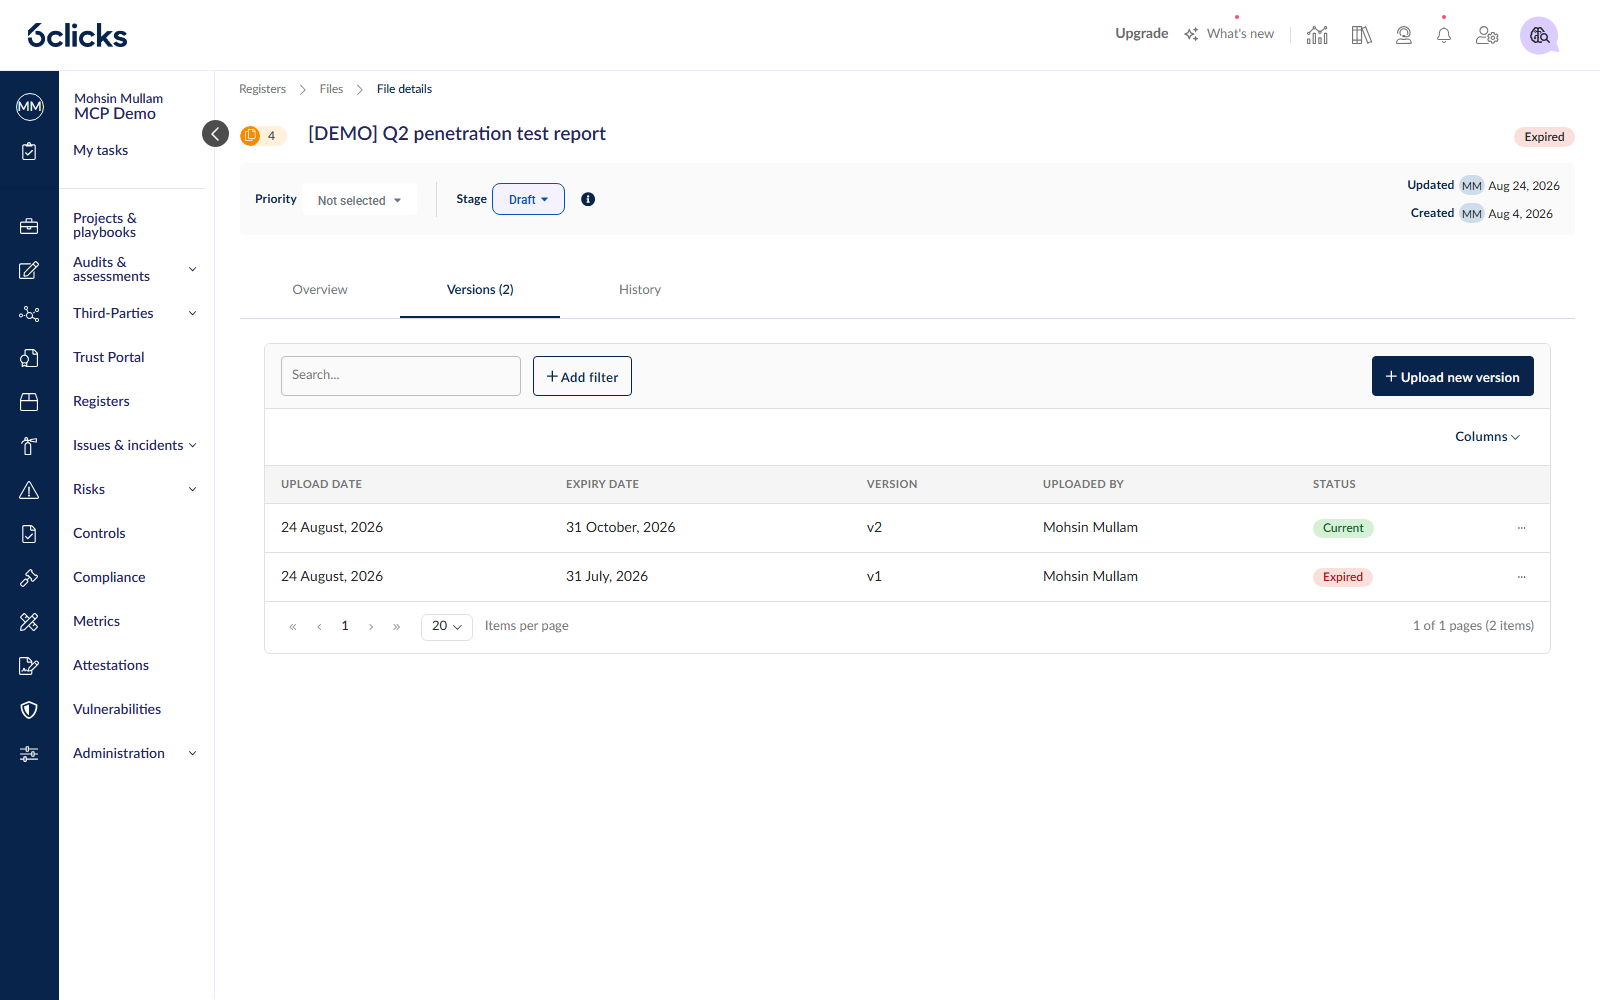
Collect once, reuse everywhere. Link the same file as evidence across tests and controls instead of uploading it again for each framework. Links point to the file record, so replacing a file once updates it everywhere it's used.
From file to evidence. Link a file to a test with a validation guide and evaluation criteria, and Hailey assesses whether or not it shows the control operated effectively, judging the evidence against the validation guide and the linked framework requirement, the way an experienced auditor would.
How it works
Open Registers → Files in your Spoke.
Upload evidence on a test or task, attach a file to a control or click Create file to add one directly. 21 file types are supported, from Word, Excel and PDF to images, audio and video, up to 100 MB. A record will be created in the Files Register.
Open the record to set its Valid from and Expiry dates and link it to the controls and tests it supports.
When a file nears expiry, upload a new version from the Versions tab. Every place the file is linked sees the update.
Open the Files Register in your Spoke to see the files from across your iGRC registers in one place.
Read here for more information: Managing & configuring the Files register
Manage controls in the Registers module. Link tests, tasks and frameworks to each control, including in bulk when importing from a template. Customize workflow stages and fields, import with Hailey and track coverage from the Insights tab. Permissions are set per role.
What's included
Register, Insights and Viewer tabs. The Register tab lists all controls with search and filtering. The Insights tab shows charts and compliance information. The Viewer tab is a read-only view that can be exported to PDF.
Configurable workflow stages. Controls move through Draft, Active and Paused by default. Stages can be renamed or extended to match your own process and ownership model.
Import from a template. Bulk-load controls from a spreadsheet, including stage, owners, tags, access members, comments, type, domain and custom fields.
Link tests, tasks and framework requirements during import. A long-requested addition. Fill in the Linked data column in the template and each control is linked to its supporting tests, tasks and requirements as it is created. No need to link items one by one after import.
Import with Hailey. Upload a policy document and Hailey extracts controls for you to review and import.
Requirement-based assessments. Enable requirement-based assessments in the register settings to make controls from this register available when creating a requirement-based assessment in the Assessments module.
Role-based permissions. Grant view, create, edit and delete access to the controls register per role under Administration, Roles, Permissions.
Worth knowing
Register settings, including Hailey import, the requirement-based assessments toggle and workflow stages, are opened from the gear icon on the register.
Learn more: https://knowledgebase.6clicks.com/custom-register-overview
You can now import register items from policy documents using AI-powered extraction. Hailey reads your uploaded document and populates the register's fields and columns automatically.
Available for all custom registers.
Supports .doc, .docx, .pdf and .xlsx files.
Uses the same Hailey import experience as other modules across the platform.
Sits alongside the existing Excel-based import under More > Import. Existing import workflows are unchanged.
To get started, open the register's Settings, click Edit in the Manage Features window, and toggle Import with Hailey to On. Then select Import > Items, choose Import with Hailey, upload your file and click Import. The page refreshes automatically once the import completes.
Learn more: .svg) Managing & configuring the controls register
Managing & configuring the controls register
You can now generate a Requirement-Based Assessment (RBA) using any custom register as the data source. Each register item becomes an assessment item, so you can assess your own records, such as internal requirements, obligations or policies, without rebuilding them as a separate library.
What's new
Register as a data source. When creating a Requirement-Based Assessment from scratch, choose Register under Data Source and select any RBA-enabled register. The Items to be Added count shows how many register items will be included.
Internal or third-party respondents. Internal assessments include all active items in the register. Third-party assessments include only the items linked to that third party, keeping the scope relevant to each vendor.
Linked data on every item. Add linked data to individual assessment items or from the assessment Overview page. The source register is linked automatically.
Custom fields and rules. Add response fields and conditional rules to shape how respondents answer. For example, an Implemented (Yes/No/Partially) field can reveal an Implementation Notes field only when relevant.
Smarter filters. Filter Draft assessments by register custom fields. Once In Progress, filter by both register and assessment fields.
Details tab in response mode. Respondents can see all linked data for the register item they are answering.
Getting started
RBA is enabled per register. Go to Registers, open Settings, select Manage Feature, turn on the Requirement-Based Assessment toggle and save. Users also need the "Create requirement-based assessments" permission for each register they will use.
Worth knowing
Only one third party can be linked to an assessment.
The third-party selection cannot be changed once responses have been captured.
Learn more: https://knowledgebase.6clicks.com/creating-a-requirement-based-assessment-from-a-custom-register
Relating a control to its risks, or a risk to its issues, has always meant knowing your registers well enough to find the matches yourself. Hailey now proposes those linkages for you, each with a confidence rating and an explanation you can check before accepting.
Mapping is the work nobody has time for. It is done by hand, one record at a time, by whoever knows the register best — so it happens inconsistently, and the relationships that make a GRC programme navigable are the first thing to fall behind.
What's New?
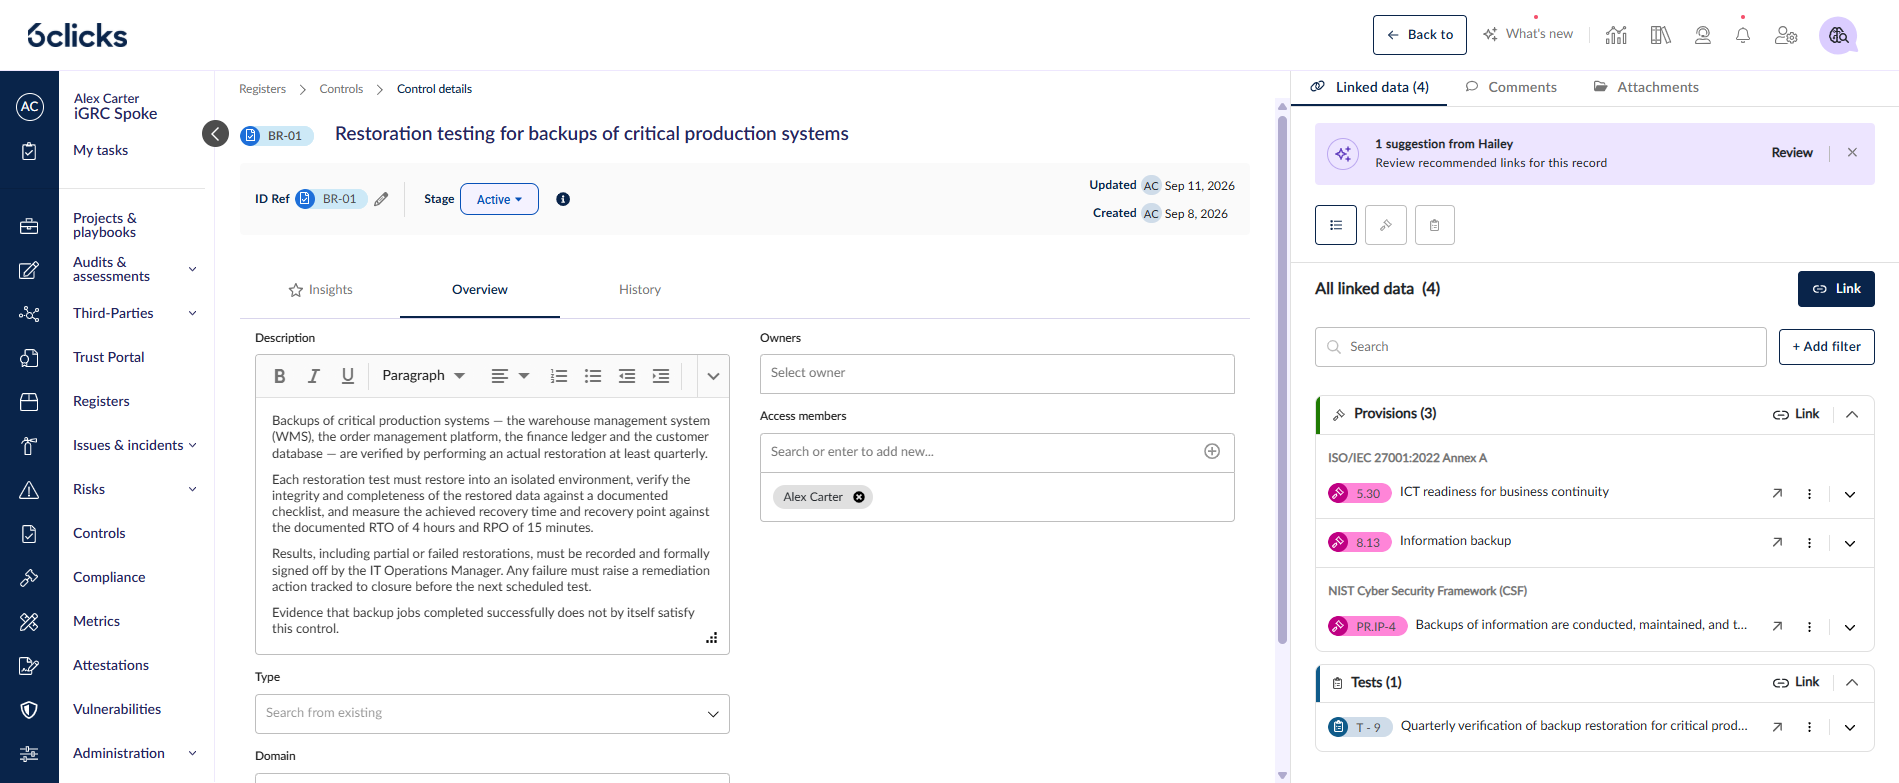
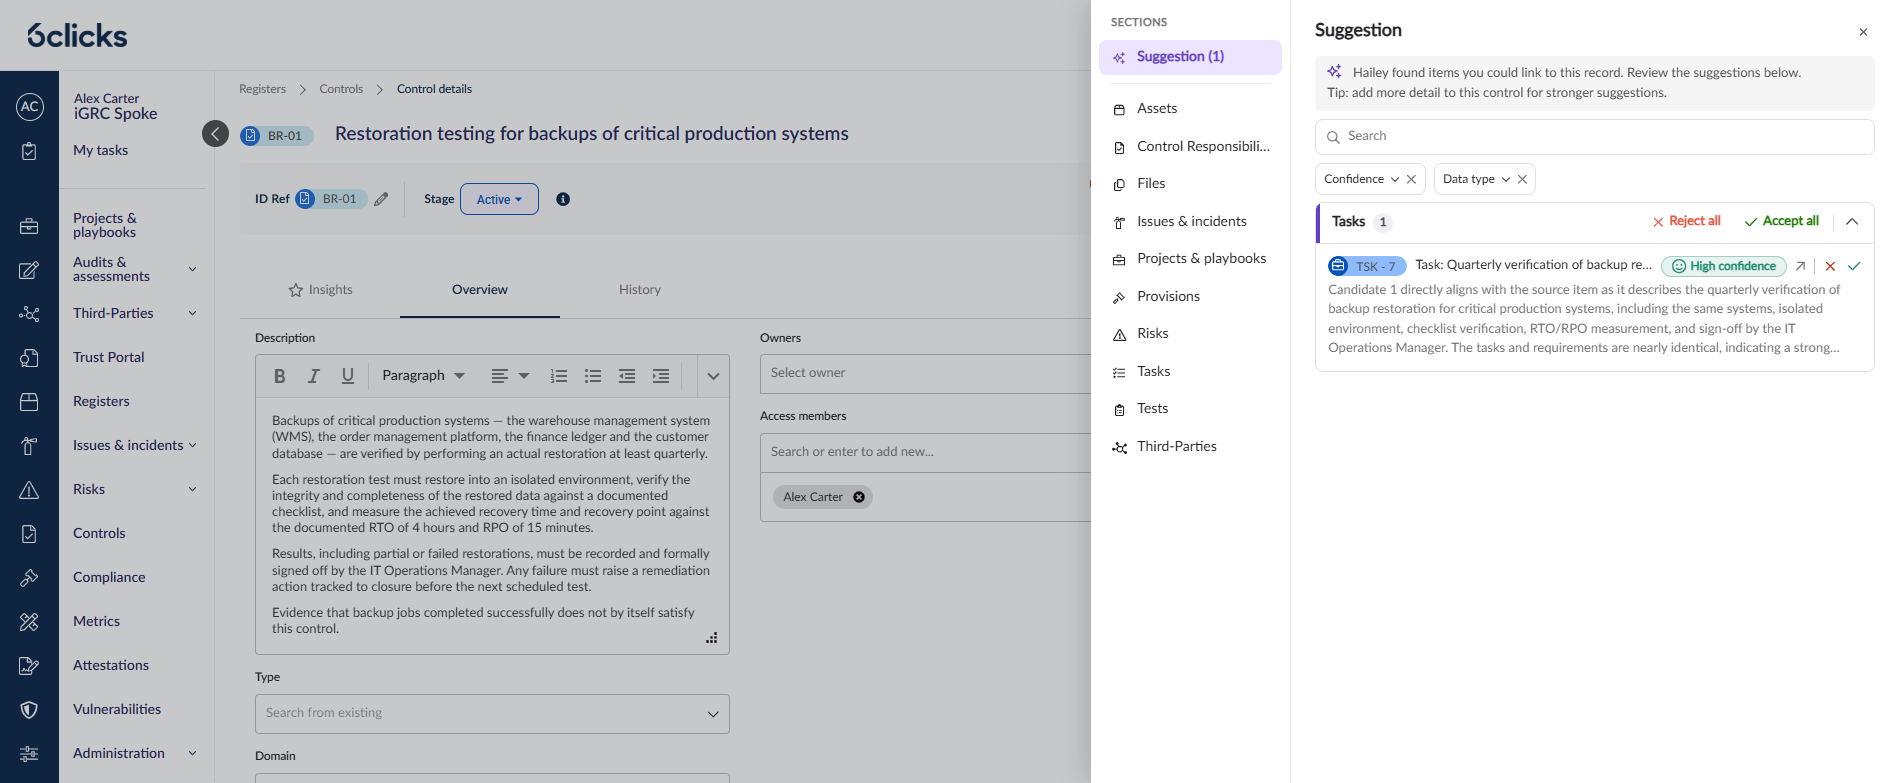
Suggestions where you already work — A banner on the register item tells you when Hailey has something to propose. Review opens the Suggestion drawer, listing everything it recommends linking, grouped by data type.
Every suggestion says how sure Hailey is — Each carries a High, Medium or Low confidence chip. A high-confidence match is a strong one you should still review; a low-confidence match is a starting point only.
And why it thinks so — Every card shows Hailey's reasoning for the match in full, so you are accepting a documented judgement rather than a black-box recommendation.
Narrow the list to what matters — Filter by Confidence or Data type, or search by name, so you only work through the suggestions you care about.
Accept or reject, one at a time or in bulk — Accept creates the linkage immediately. Reject dismisses it and feeds back into future suggestions, so rejecting a poor match is more useful than ignoring it. Accept all and Reject all act on a whole group at once, within whatever filters you have applied.
Mistakes are cheap to undo — Recent Hailey accepts (last 24h) lists what you've just linked with an Unlink on each, so an over-eager Accept all is straightforward to reverse. Unlinking removes the relationship only; it never deletes the item.
How it works
Open a register item that has a description — Hailey works from the record's content.
Select Review on the Hailey suggestions banner to open the Suggestion drawer.
Read Hailey's reasoning on each card, or open the suggested item in a new tab to read it in full.
Accept to create the linkage, or Reject to dismiss it.
Use Recent Hailey accepts to undo anything, and All linked data to see everything linked to the record however it got there.
Worth knowing
Accepting needs permission on both registers — Edit on the register of the record you're working in, plus access to the register of the item being linked. Without both the action shows Requires permission, and a bulk accept reports how many could not be linked.
A record with no description gets no suggestions — Hailey will prompt you to add one. More detail produces stronger matches.
Requires Hailey-assisted register-item mapping enabled for your tenant.
Open any register item with a description to see what Hailey suggests linking.
Learn more: Hailey-assisted mappings in Registers
Collecting evidence is easy; validating it actually demonstrates that the control worked is the slow part. Hailey now writes the evidence standard for every test and assesses submissions against it, so gaps are found at submission time instead of at review time.
Evidence collection runs on a rejection loop. The person who holds the evidence usually isn't the person who owns the control, so they send something plausible, it gets rejected, and the cycle repeats while the audit deadline moves closer. The quality bar lives in one person's head and gets applied inconsistently across hundreds of tests.
What's New?
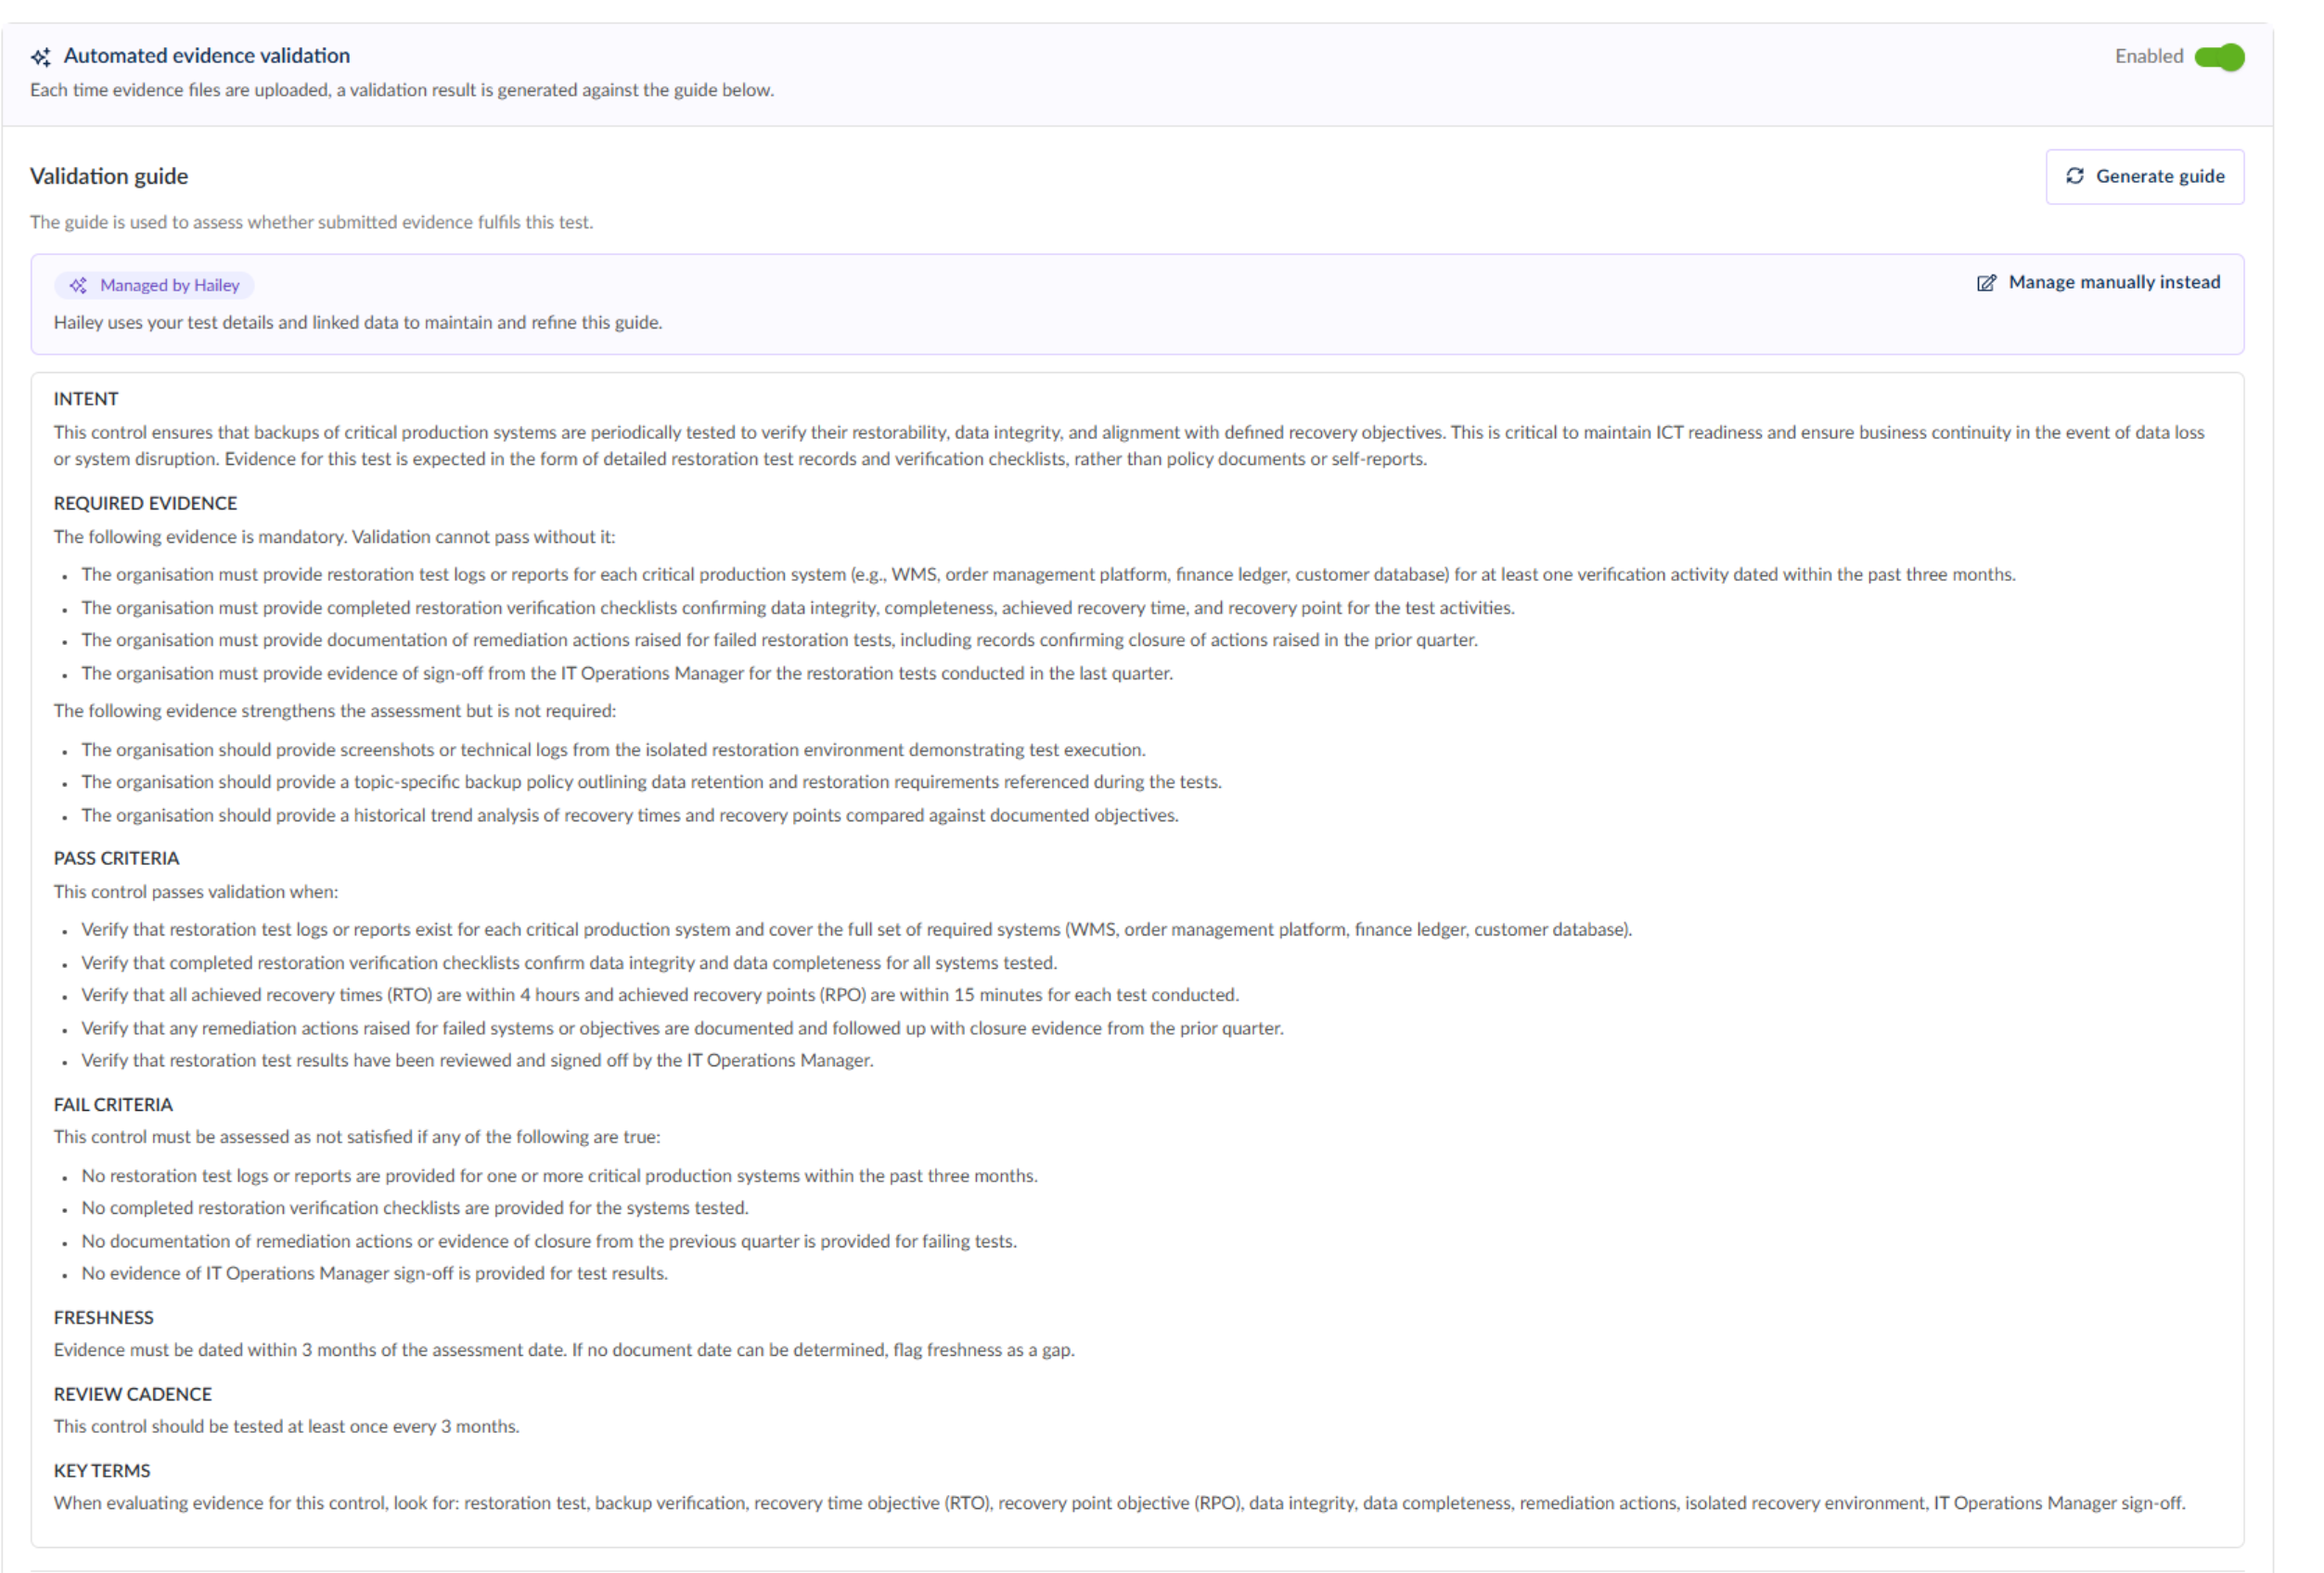
A validation guide is written for every test, automatically: When you create a test in the Tests register, Hailey writes a plain-language definition of what valid evidence looks like for that specific test, drawn from the test details, the linked control's description and the framework provisions to which the control maps. No per-test configuration, so coverage grows as your register does.
The guide is a structured standard, not a paragraph: It sets out the intent, the evidence that is mandatory, what strengthens an assessment, pass and fail criteria, how recently evidence must be dated, and the review cadence. The freshness window is derived from the test's own frequency.
You own the wording when you want it: Leave the guide at Managed by Hailey and it keeps improving as you link more data, or switch to Managed manually to write it yourself. Switch back with Ask Hailey to manage at any time.
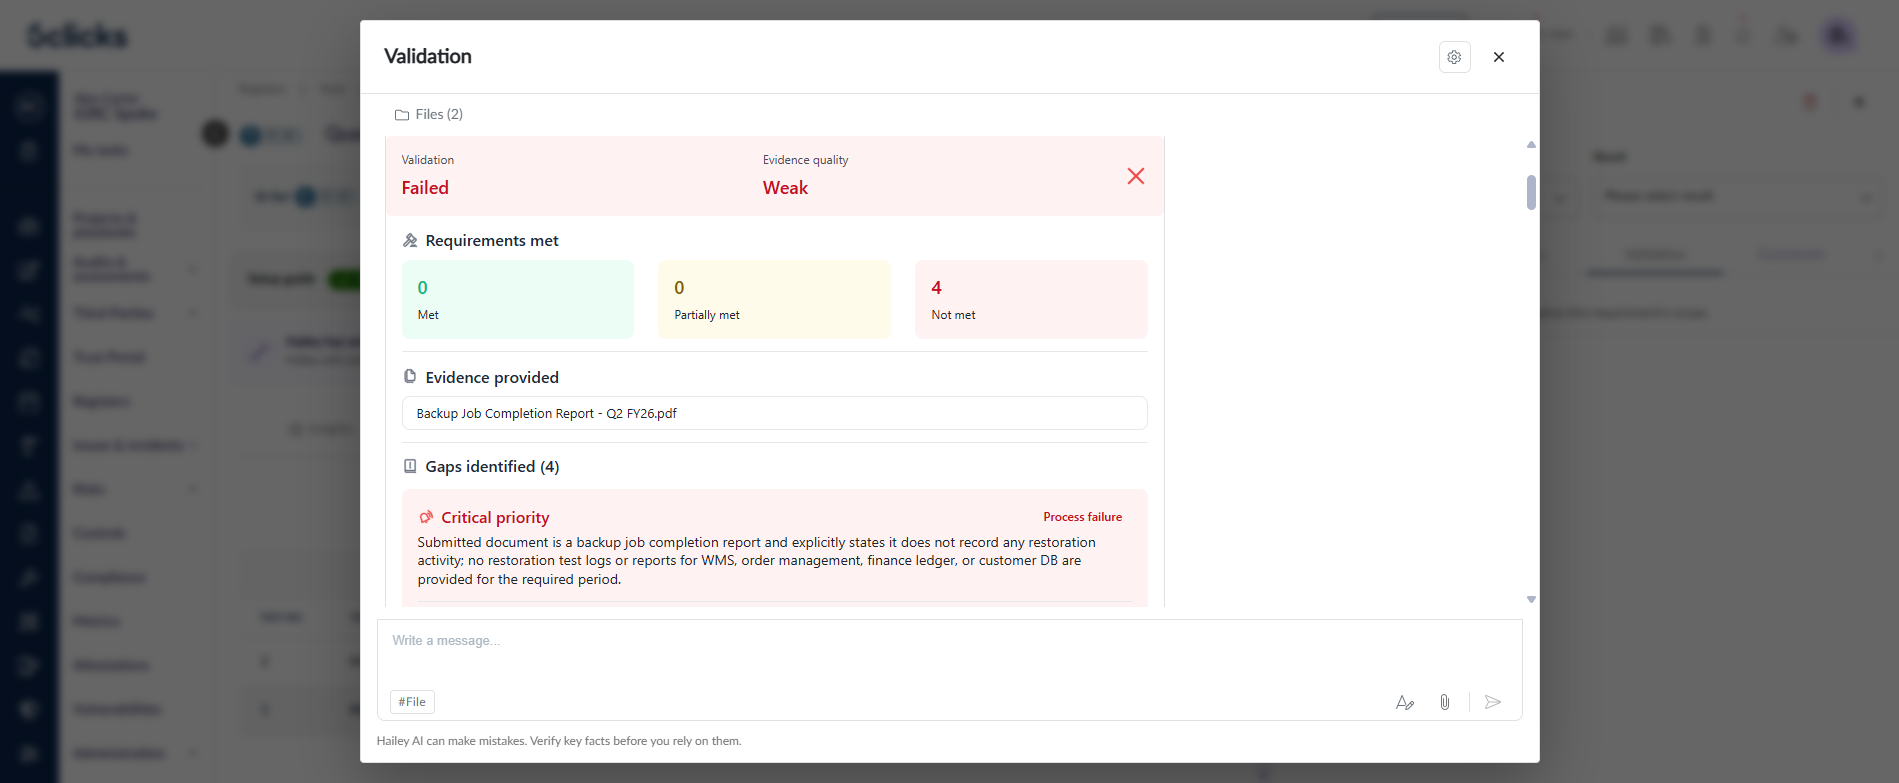
The findings are supported by the logic or evidence behind them: Each assessment returns a Validation result, an Evidence quality rating and a count of requirements met, partially met and not met. Validation highlights quote the passage in your document that satisfied each point.
Gaps come with a to-do list: Every gap carries a priority from critical to low and a type: a process failure, where the control did not operate correctly; a coverage gap, where it missed systems or periods it should have covered; or a documentation gap, where it happened but isn't evidenced. Each one includes suggested actions, so a failed validation tells you what to collect rather than just saying no.
Collection can be handed to someone else: Setting a scheduled test's log to Ready for evidence collection creates an evidence validation task automatically (unless one is already linked) named after the test, carrying its schedule and assigned to the people named on the test.
Submitters work in the task, not the test: Whoever collects the evidence uploads it on the task log and Hailey assesses it against the same validation guide. They see what is missing before the submission reaches a reviewer.
The decision stays with a person: Hailey never sets the outcome. The test owner reviews the assessment and sets the log's status and result.
How it works
Create a test in the Tests register and link it to the control it verifies. The guide is generated for you.
Review the guide on the test's Configuration tab. Edit it by switching to Managed manually, or sharpen the control description and regenerate.
Optionally attach supporting files as reference material for Hailey, e.g.,
.docx,.xlsx,.pdf,.md,.txt,.png,.jpg,.jpeg.Set a test log to Ready for evidence collection. This snapshots the guide against that log, so later edits never change the criteria a completed log was judged against.
Add evidence on the log's Evidence tab. Validation starts automatically.
Read the result on the Validation tab, then set the log's status and result yourself.
Where collection is delegated, the assignee works through the task log instead: they move it to In Progress, upload evidence on its Evidence tab, review the assessment on its Validation tab, and set it to Completed when done.
Worth knowing
Automated evidence validation is on by default for tests and can be turned off per test.
Hailey needs the test linked to a control that has a description. The guide is built from that description so a vague control produces a vague guide.
A guide is generated automatically when a test is created and can be regenerated on demand from the test.
Administrators can set a reference assurance scheme in register settings: ISO/IEC TS 27008 is used by default, or you can set it to ISO 27001, SOC 2, PCI-DSS, NIST CSF or IRAP. This sets the evidence-quality lens Hailey applies.
Requires the Hailey for evidence validation feature for your team.
Open any test in the Tests register to see the validation guide Hailey has already written for it.
Learn more: Hailey evidence validation
Finding the right control for a risk used to mean knowing where it lived. Now Hailey suggests them for you, ranked and explained.
Overview
Open a risk and Hailey reads its name and description to find the controls and provisions in your libraries that address it. Each suggestion carries a confidence rating and a written explanation of how it relates to the risk, so you can judge it rather than take it on trust. Search in the same panels now matches on meaning as well as spelling.
What's New
🔹Suggestions before you search. While editing a risk, select the Controls & compliance tab. The right-hand panel then shows Controls and Provisions tabs. Leave the search box in either tab empty and Hailey fills the list with related records from your libraries, merged with the ones already linked to the risk, and marks the five strongest matches with a sparkle icon.
🔹A confidence rating and an explanation on every suggestion. Hover a sparkle icon for Hailey's rating of the match: high, medium or low confidence. Click it to open Hailey suggestions, which explains how that control or provision relates to that risk.
🔹Search that matches meaning, not just spelling. Search now runs across all your published control sets and authorities when linking to a risk, so you no longer pick one first. Obligations and Obligaton both find obligation-related controls.
🔹 You decide what gets linked. Suggestions are proposals. Linking a control or provision to a risk works exactly as it does today, under the same edit permissions.
Good to know
Available now. Hailey for Risk suggestions is on for your tenant. There's nothing to set up.
Permissions are unchanged. Suggestions appear in the same linking panel as before, so anyone who could link controls and provisions to a risk can use them.
Your existing links stay put. Controls and provisions already linked to a risk remain in the list and are not pushed out of view by suggestions.
Suggestions or search, not both. Suggestions show while the search box is empty. Type, and the panel switches to search results and hides the sparkle icons.
Only published control sets are included. Suggestions and search cover controls in published control sets and your authorities' provisions. Recent changes may take a few minutes to be reflected.
Quality follows your data. Suggestions come from the words in your risks, controls and provisions. Thinly described records produce weaker suggestions.
How it works
Open a risk and go to the Controls & compliance tab.
Choose the Controls or Provisions panel.
Leave the search box empty. Hailey's suggestions appear, with a sparkle icon on the five strongest matches.
Hover a sparkle icon to see the confidence rating.
Click the sparkle icon to read why Hailey suggested it.
Link the control or provision the way you always have.
To search instead, type at least three characters. Suggestions give way to search results.
Head to any risk and open Controls & compliance to see what Hailey suggests.
Read more in Finding controls and provisions related to a risk on the 6clicks Knowledge Base.
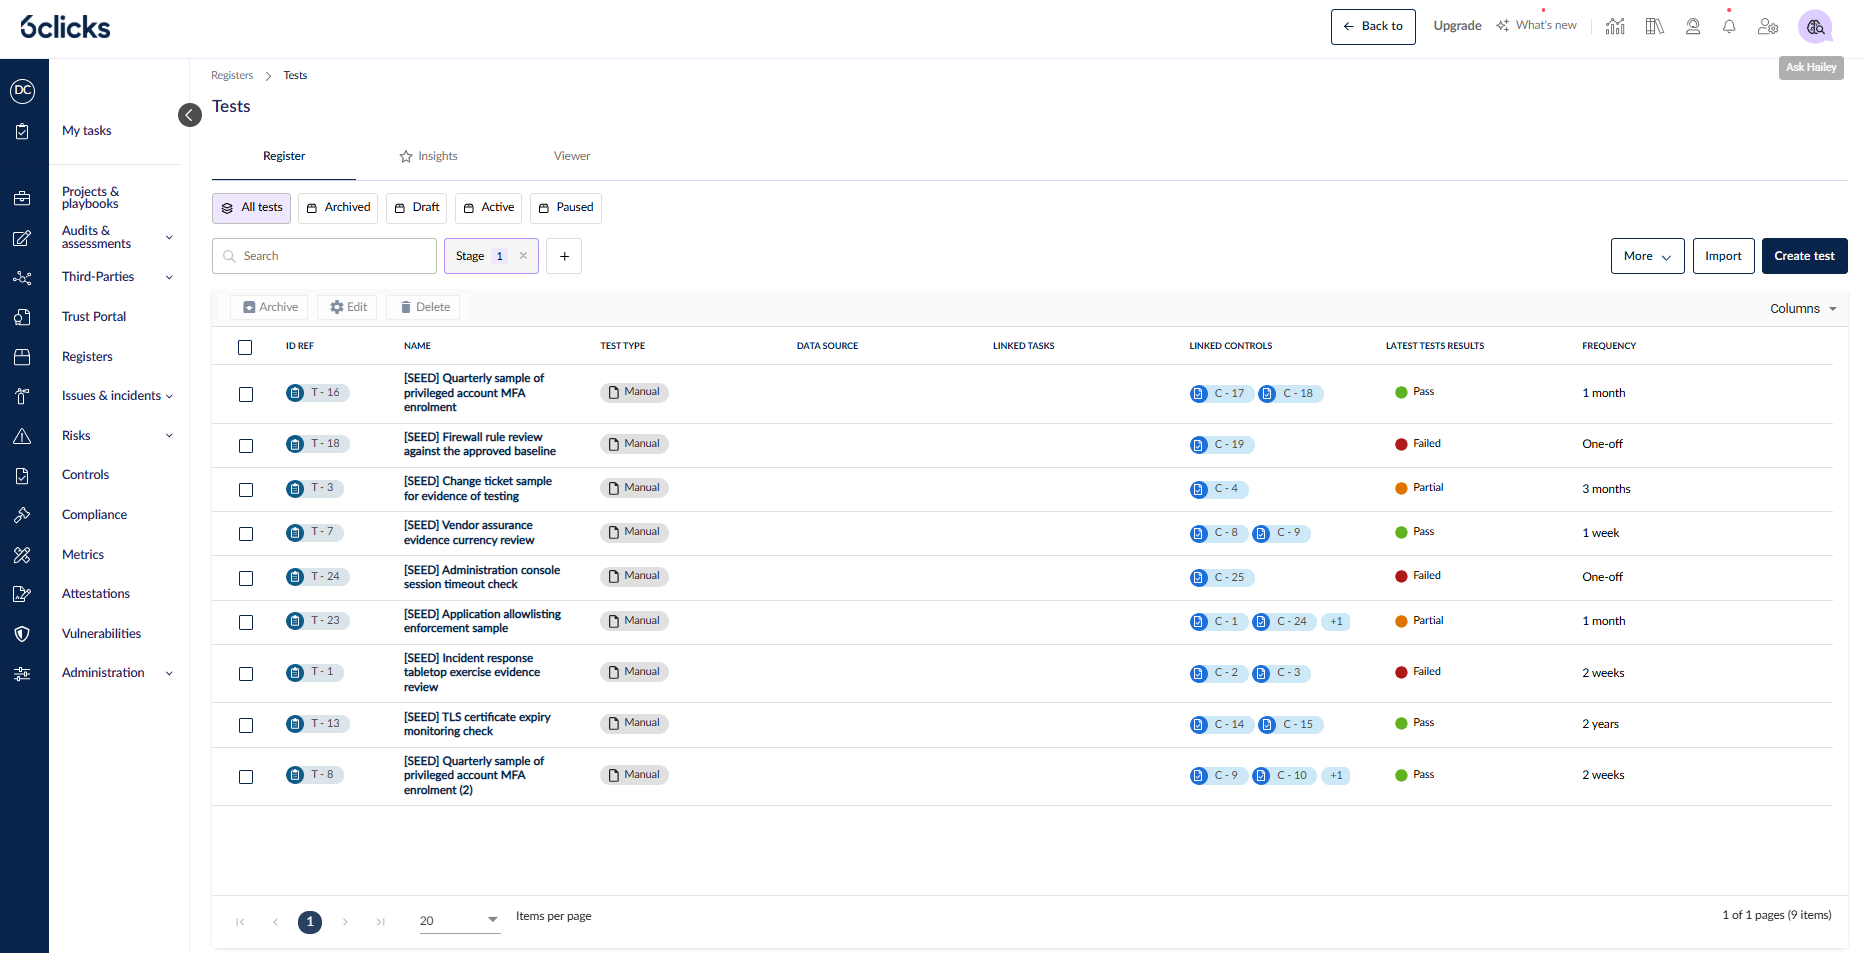
Control testing used to live in spreadsheets, chased by email. Two new registers now hold it in the platform: the Tests register defines what you test and how often, and the Tasks register holds the work that goes with it. Set a test up once, and 6clicks opens each testing period, raises the evidence task, and keeps a dated record of every run.
Availability. The Tests and Tasks registers are turned on per team by 6clicks as part of iGRC. They are not switched on automatically. When your team is set up, the register permissions go to the Administrator and Advisor roles, and an administrator can pass them on to any other role or user. Talk to your account team to have them enabled.
What's new
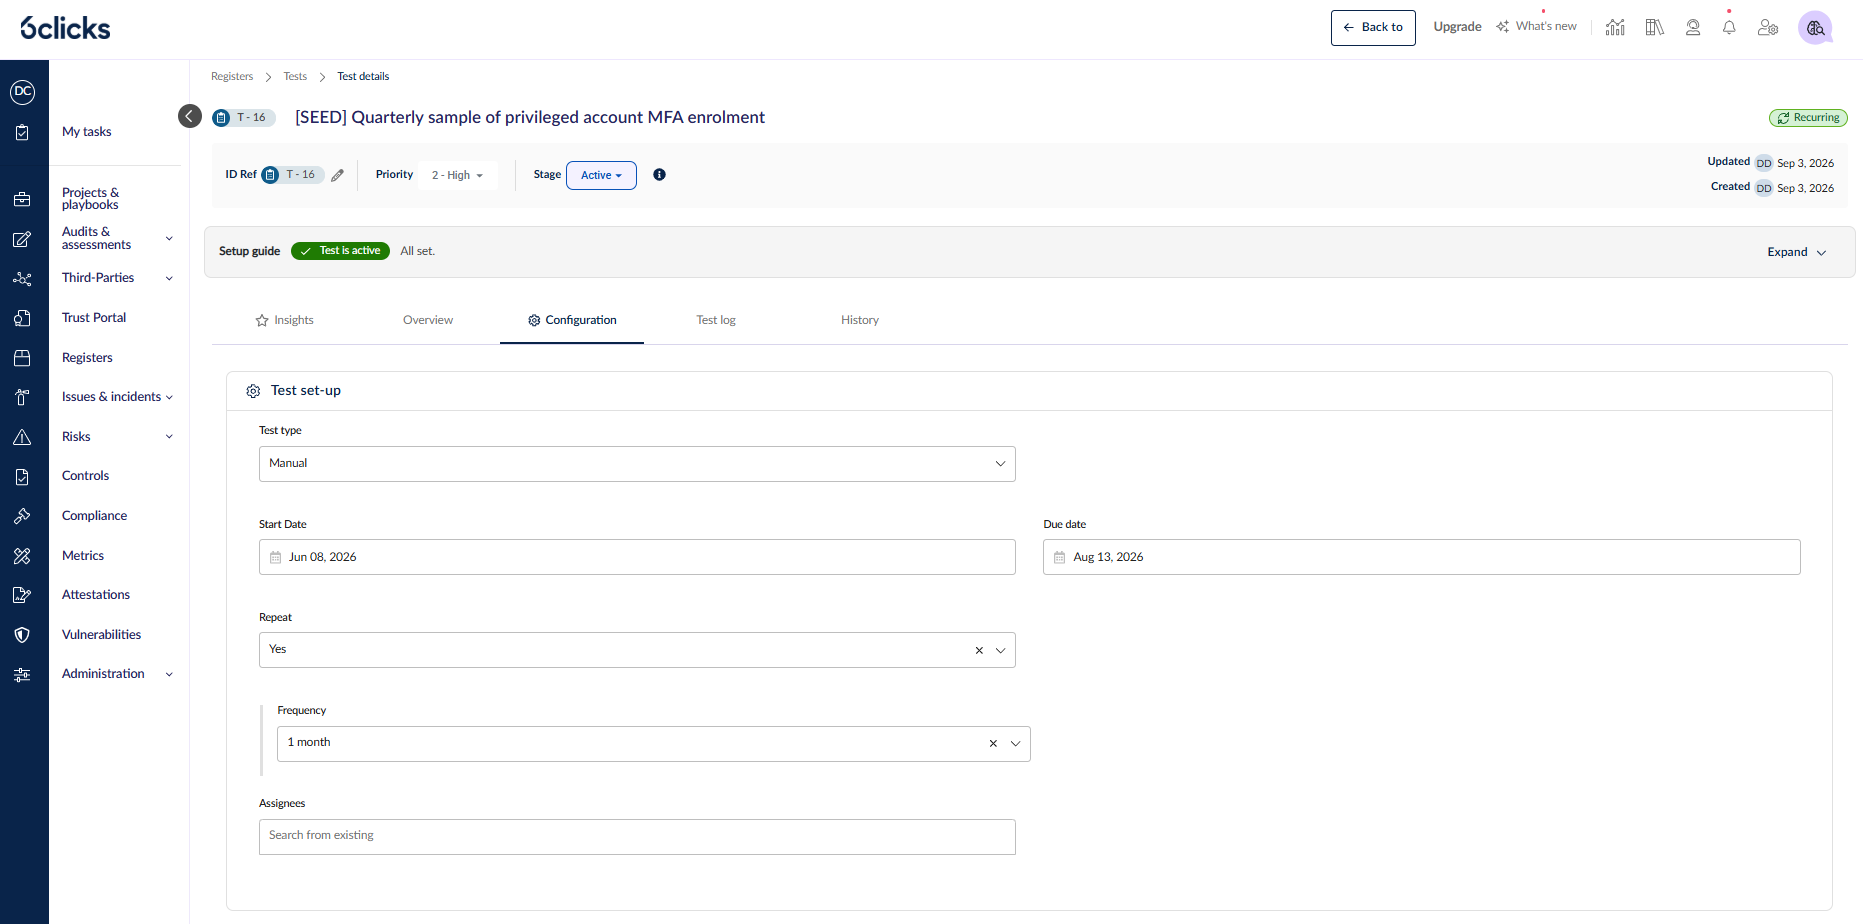
Set up how a test runs, then activate it. The Test set-up panel on the Configuration tab holds Test type (Manual or Automatic), Start date, Repeat and Frequency. A Manual test also takes a Due date and Assignees; an Automatic test takes a Data source instead. A collapsible Setup guide at the top of the record tracks one required item — Set up evidence validation — and three recommended ones, then lets you Activate test. Activating creates the test's first test log.
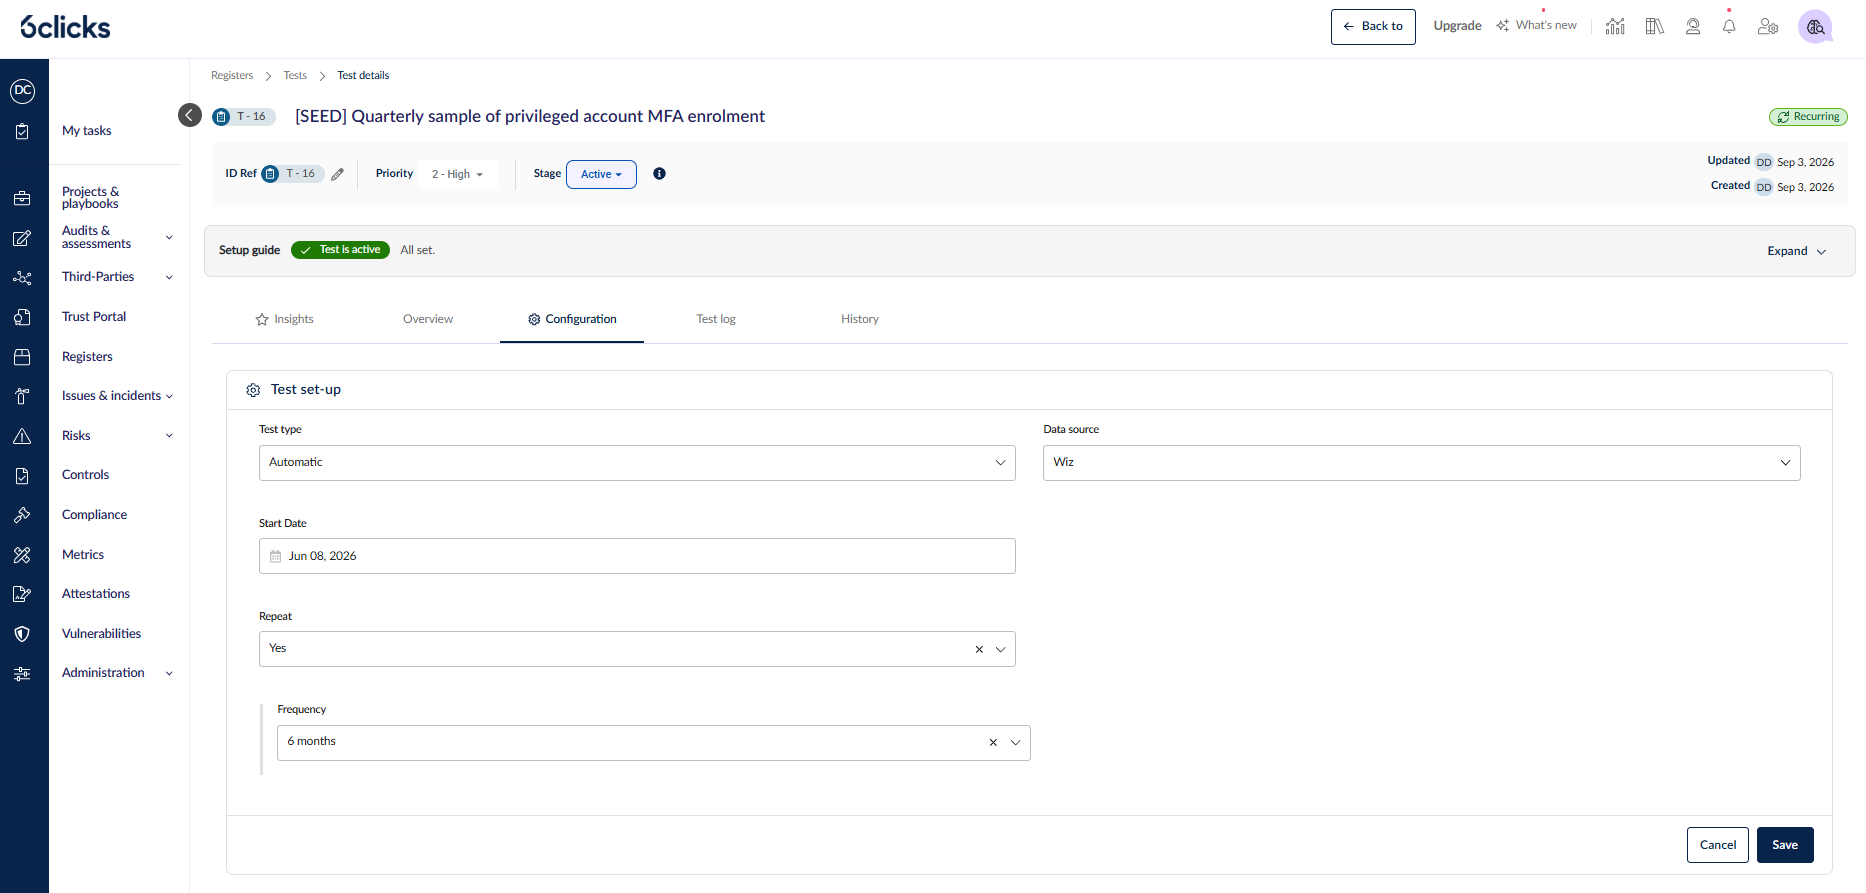
A Tasks register for the work around your controls. Tasks are records in their own right, with an ID Ref of the form TSK - 1, a Type of Generic or Evidence validation, and their own task logs. A task with a start date, a due date and Repeat set generates a log per period, so recurring work has an owner, a date and a record of each occurrence. Logs appear in the assignees' My Tasks list.
Evidence collection is joined up between a test and its task. For a repeating Manual test in the Active stage, each scheduled test log now opens at Ready for evidence collection rather than Not started, and 6clicks raises the evidence-validation task at the same moment. The task and the test log share the same evidence, the same comment thread and the same validation guide, so the person collecting evidence never has to open the test. When an assignee moves the task log to *In progress*, the linked test log follows; completing it moves the test log to Under review.
Findings on a test log. A test log now has a Findings tab for recording what came out of that run — a risk, an incident, a task raised to fix something. Use Link items to search any register, tick one or many, and save in one action, or create a new item from inside the drawer. Findings belong to that one log, so each run of a recurring test keeps its own list, and they roll up onto the test's Linked data panel. The tab appears once the log has started, and editing it needs the test-log edit permission. Items from Test and Control registers, Provisions, and Evidence validation tasks cannot be linked as findings.
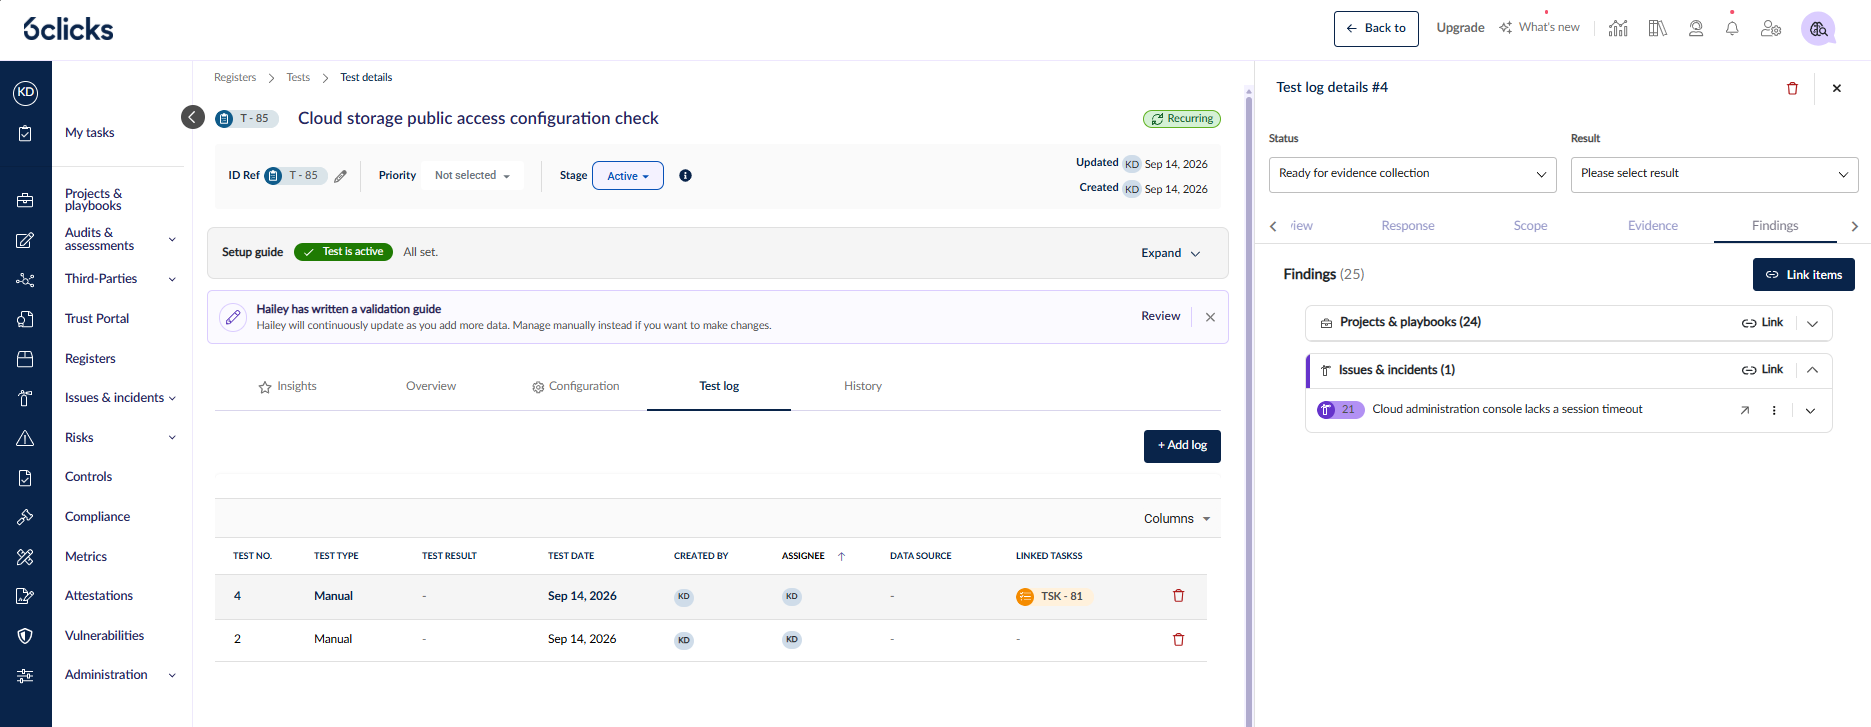
How it works: setting up a recurring control test
1. Open the Tests register and create a test. Give it a Name and, if you want your own code, edit the ID Ref.
2. On the Configuration tab, open Test set-up. Choose a Test type of Manual, set the Start date, *Due date* and Assignees, set Repeat to Yes, and choose a Frequency.
3. Set up evidence validation on the test. This is the one item the Setup guide requires before you can activate.
4. Select Activate test. The test moves to the Active stage and its first test log is created at Not started.
5. From the next period onward, each scheduled test log opens at Ready for evidence collection, the test's validation guide is frozen onto it, and the evidence-validation task is raised and linked automatically.
6. The assignee works the task from My Tasks. Moving it to In progress moves the test log with it; uploading evidence writes to both. Completing the task log moves the test log to Under review for the reviewer.
7. Record what came out of the run on the log's Findings tab.
Worth knowing. One evidence-validation task is raised per test, not per log — later periods attach a new task log to the same task. If your team has no Tasks register, or the acting user cannot create records in it, the test log is still created but no task is raised. Scheduled tasks are attributed to a stand-in user (a test owner, an owner's org-unit member, the item creator, or an administrator), so audit fields name that person rather than "System".
Talk to your account team about switching on the Tests and Tasks registers for your team.
Read more:
Next level search and filtering just for your registers.
Issues & Incidents, Controls, Files, Tests, Tasks, and Custom Registers can now do cross register and field filtering. Now you can find the insights and information you're looking for faster, easier, and more reliably.
Your New Basic Filters:
Standard and custom fields have gotten easier to use for quick simple queries.
One convenient location: Now custom fields and standard fields can all be accessed from one easy location to add only the filters you need.
Basic operators: All fields can now be filtered using the operator
is emptyoris not empty. Making it easy for you find incomplete or missing data.
Advanced Filter Views:
Stepping up the filtering experience empowering you to get better insights into your data.
Advanced filter builder: Build your own advanced filters combining register fields across linked data relationships.
Save views: Save your advanced filters, making it easier for you to improve your workflows.
Your New Filter Experience:
Your standard filters are round under the Add filter button. Add more filters by clicking on the + that appears for each additional filter you want.
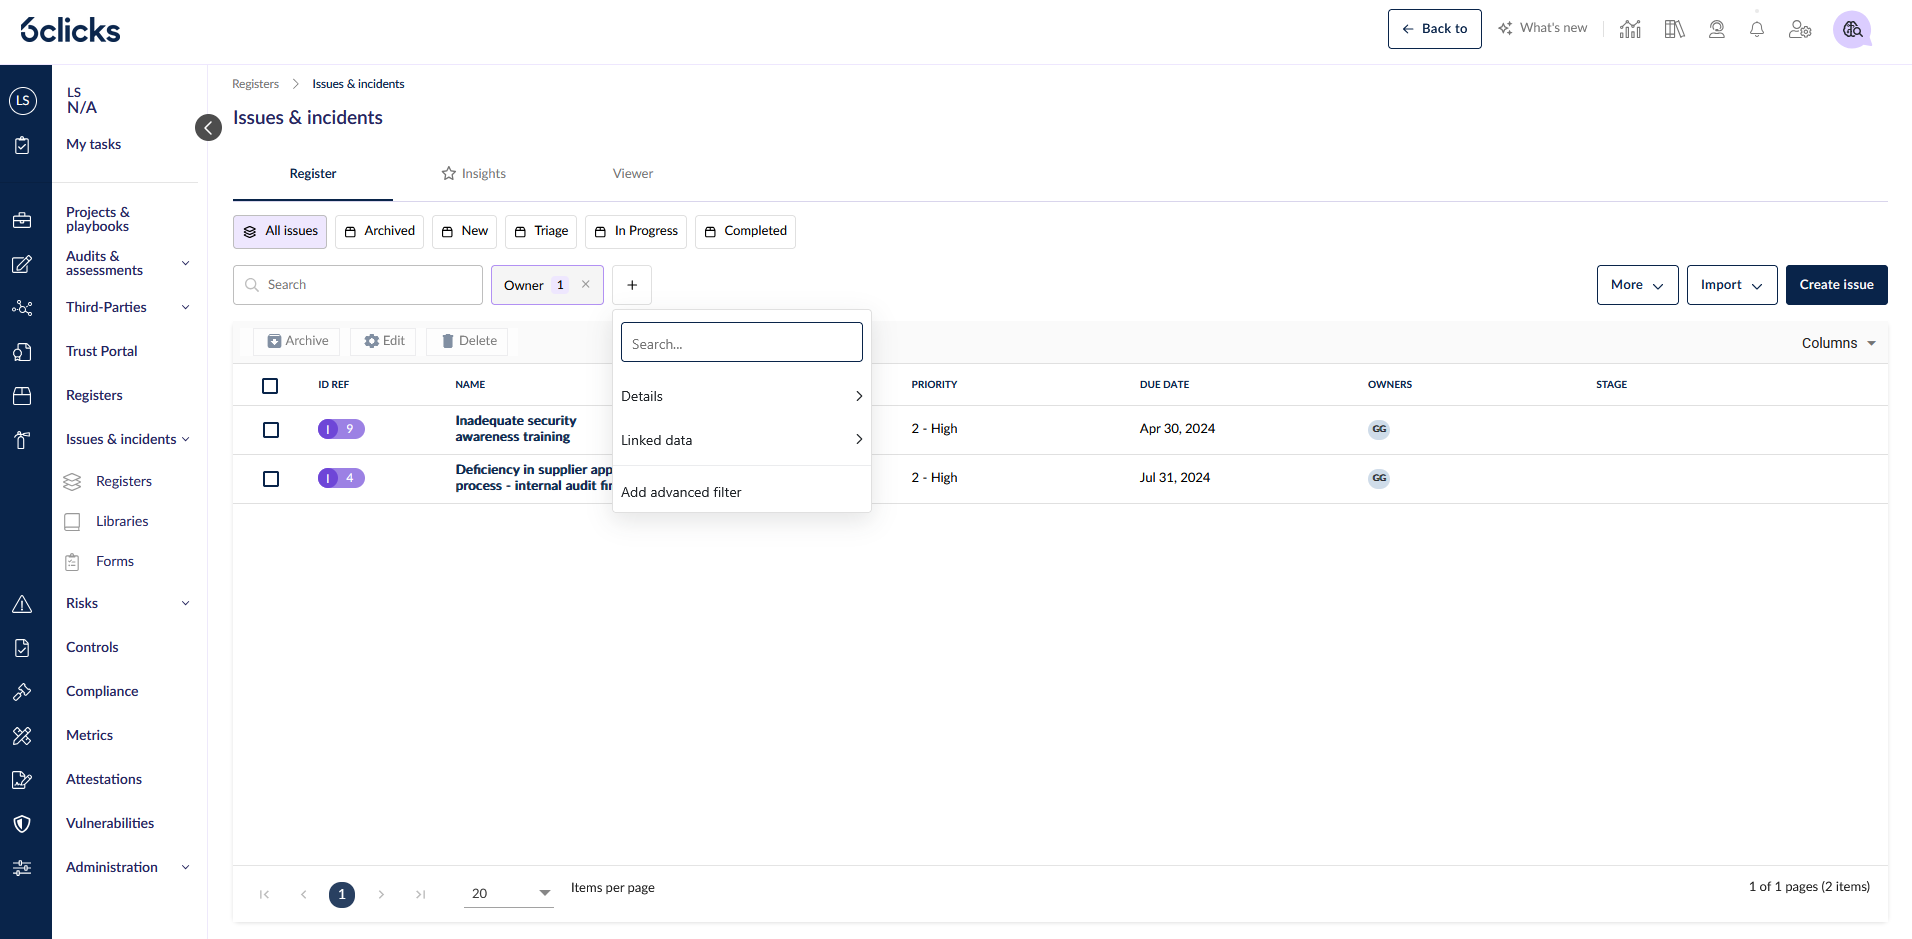
Creating and Saving Advanced Filters:
Under the standard filters there's the option to Add advanced filter, this will open the modal to configure your advanced filter query. From here you have a number of powerful operations at your fingertips.
Linked data: Select a data type to create a group of conditions for fields on that data set.
Match operators: Use both
ANDandORoperators to do complex conditional filteringGroup conditions: Create condition groups to drill down further.
Save as view: Use the "Save as view" button to save the query to your views for quick access later.
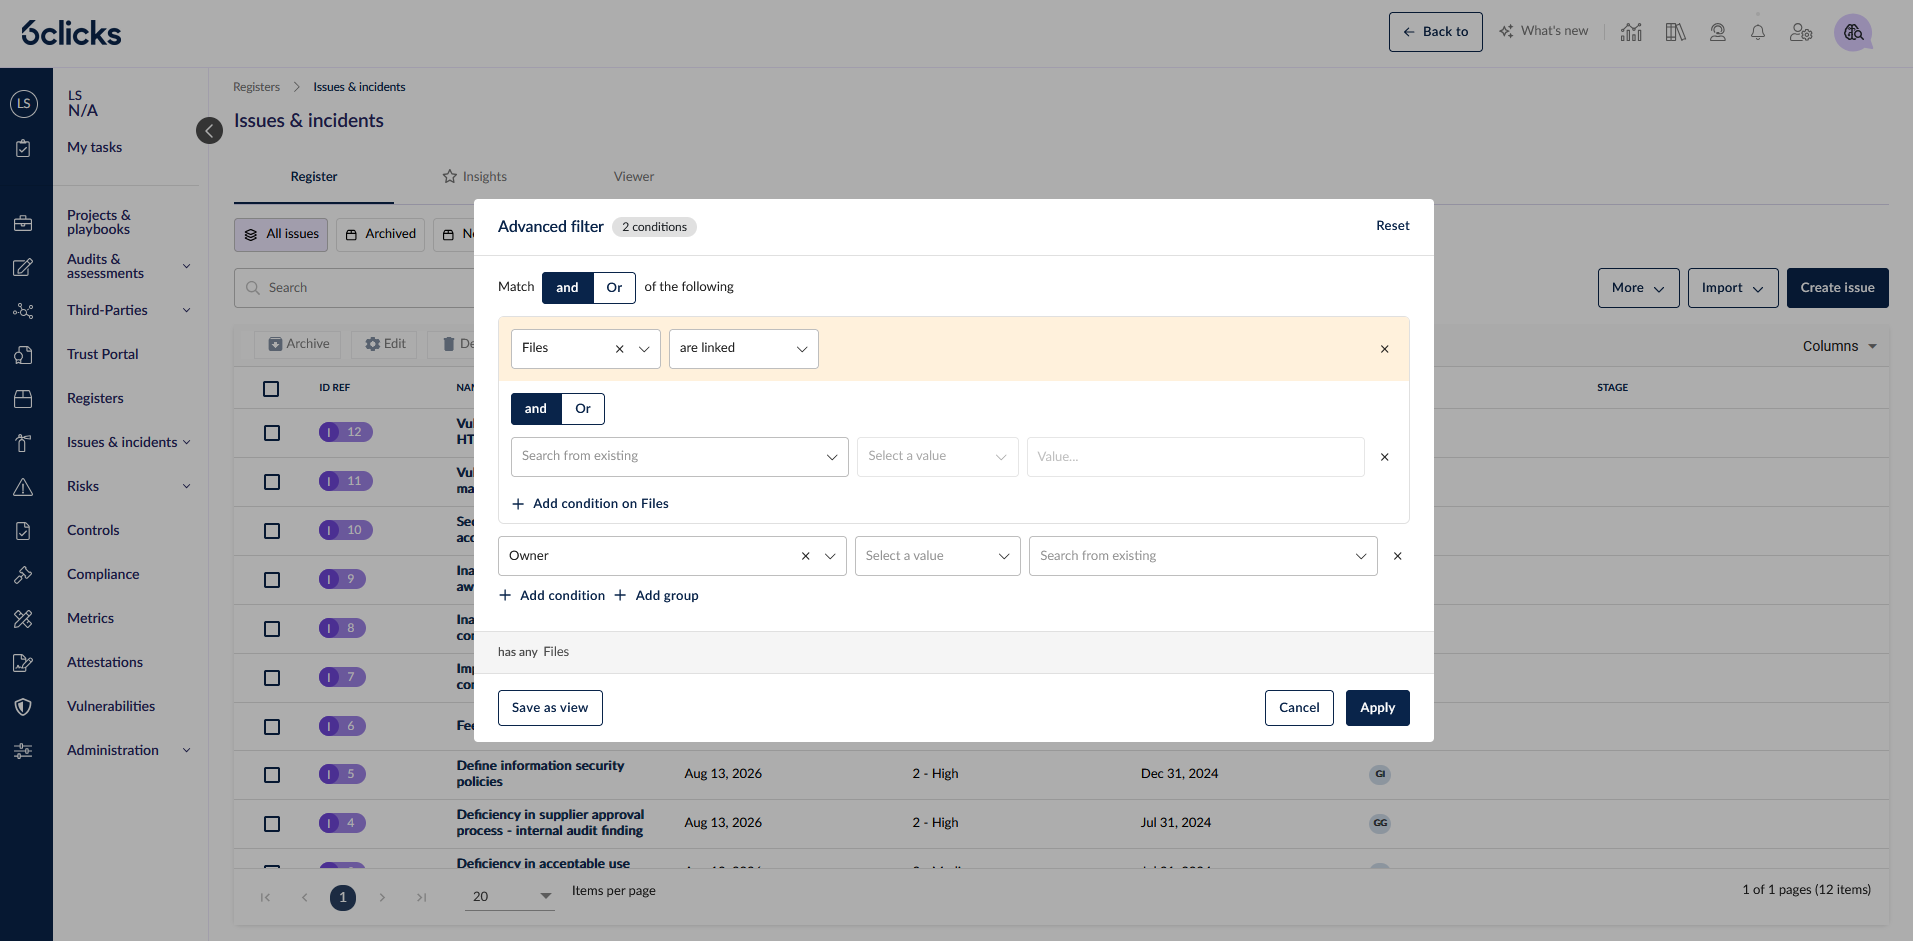
For more information on using the new advanced filters and search consult the knowledge base article Linked data search and filter.
Reviewing comments on assessments
You can now add comments directly to any question or requirement while reviewing question‑based and requirement‑based assessments, keeping feedback, queries and context exactly where the work happens.
Tag individual users or user groups with @mentions to notify them instantly via in‑app and email alerts, and assign comments to specific people so they surface in their My Tasks view for clear ownership.
Mark comments as resolved to track discussions to completion, with a full Review Trail preserving the comment history for every question. The result is faster, more collaborative reviews and a defensible audit trail - no more recreating feedback or chasing it across email and spreadsheets.
See the knowledge base for more information.
Miscellaneous improvements
Look for the new "Clear Formatting" button in rich text editors. This feature makes it easy to tidy up formatting after copying and pasting from an external system, and is being rolled out across the platform.
Administration features
SSO issuer checks have been tightened. In your SSO configuration, ensure that whitespace is removed, and ensure trailing slashes exactly match the requirements detailed for your identity provider in the knowledge base.
Roles and permission can now be exported in Excel format from the Roles administration screen.
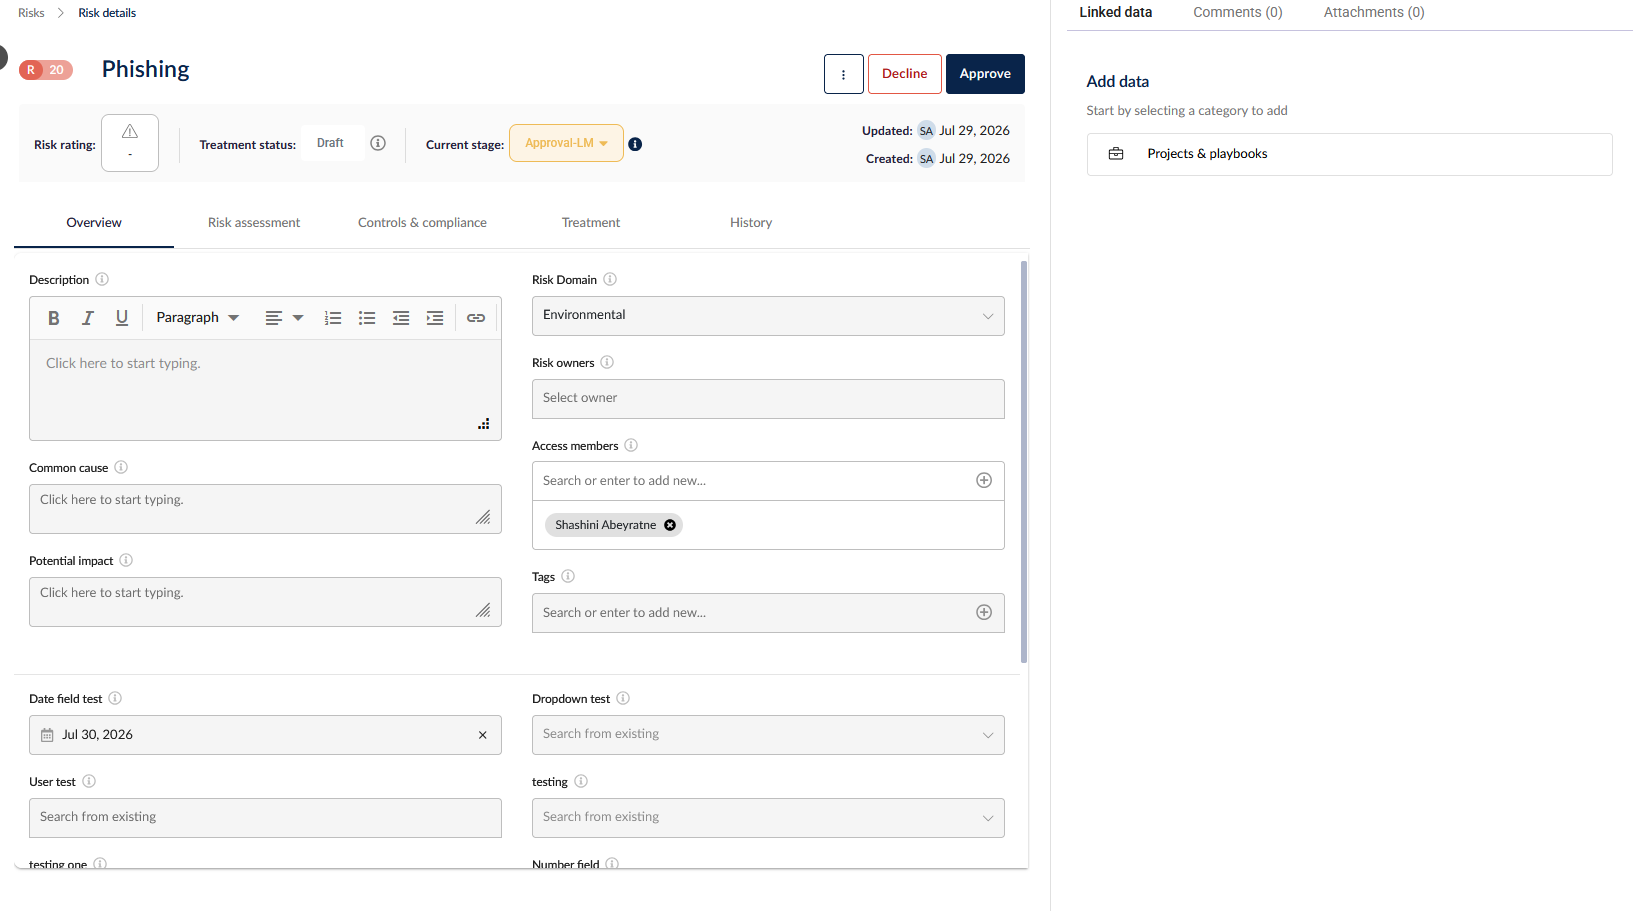
Risks that need sign-off before they progress — accepted risks, treatment decisions, closures — previously relied on manual follow-up outside the workflow. You can now add Approval stages to your Risk workflow, so designated approvers must review and approve a risk before it moves on.
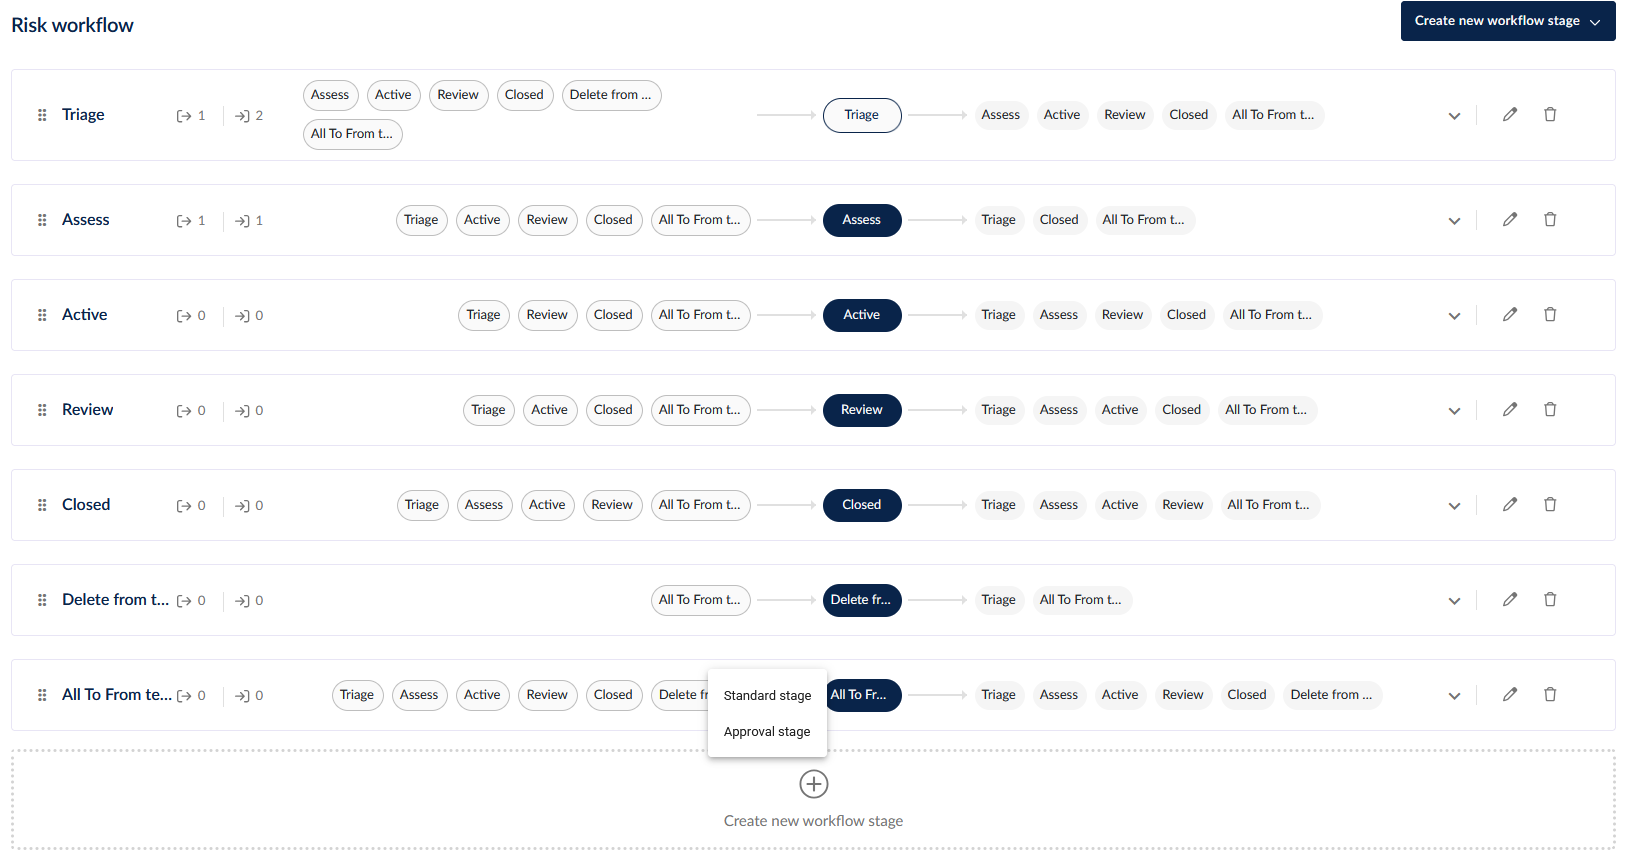
Approval stages in the Risk workflow. When creating a workflow stage you now choose between a Standard stage and an Approval stage. The stage type is set at creation and cannot be changed later.
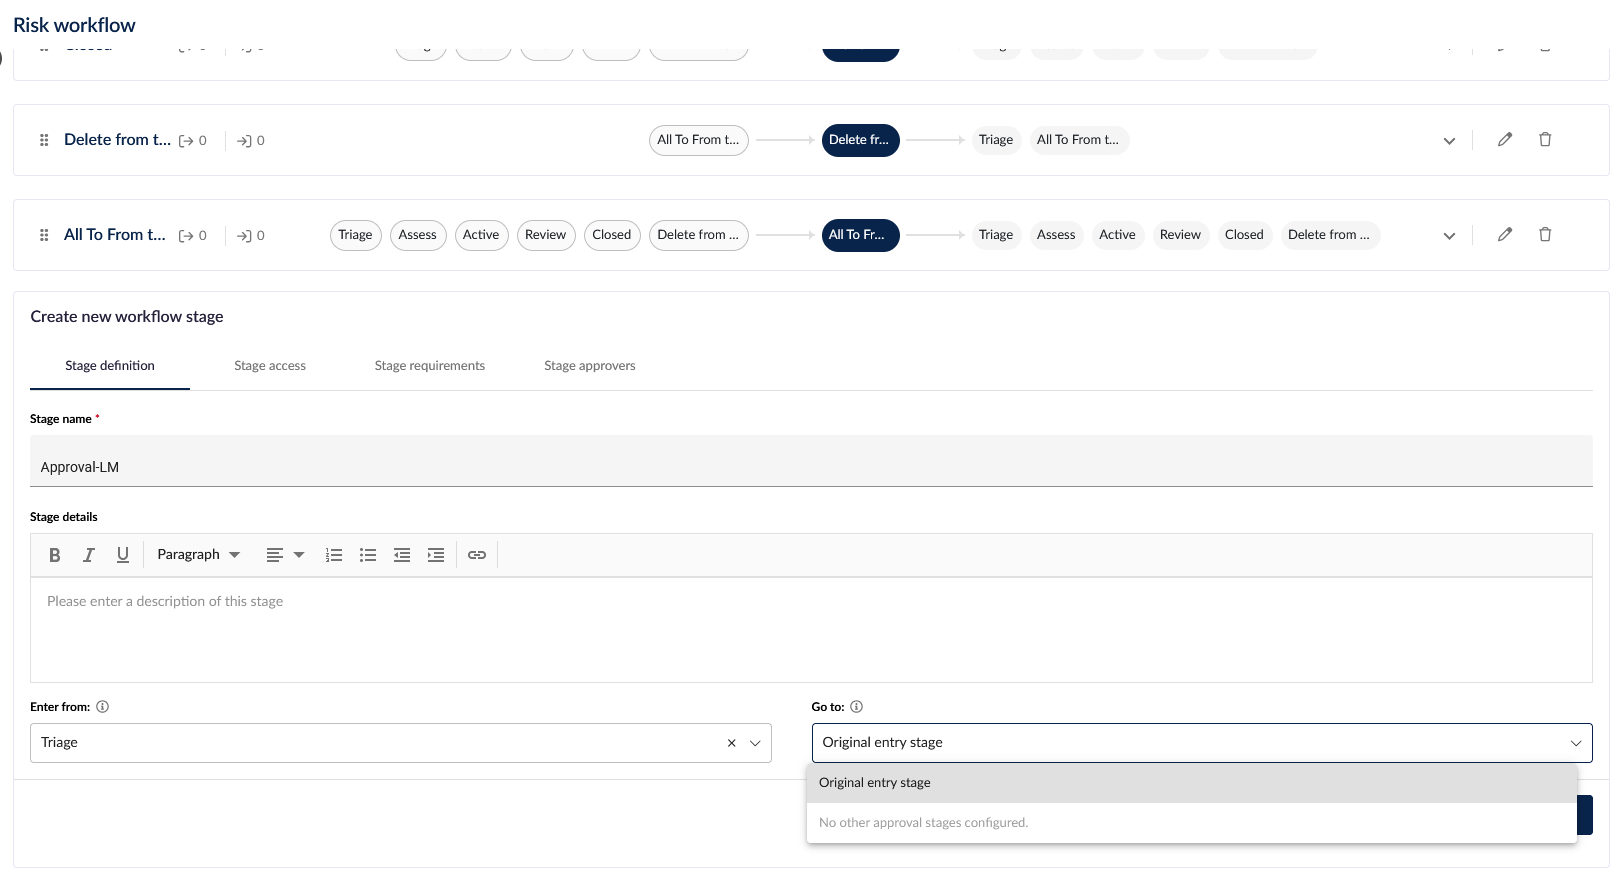
Approval stages define who must approve and where the risk goes next, which only supports the static option "Origin stage" or any other configured approval stage.
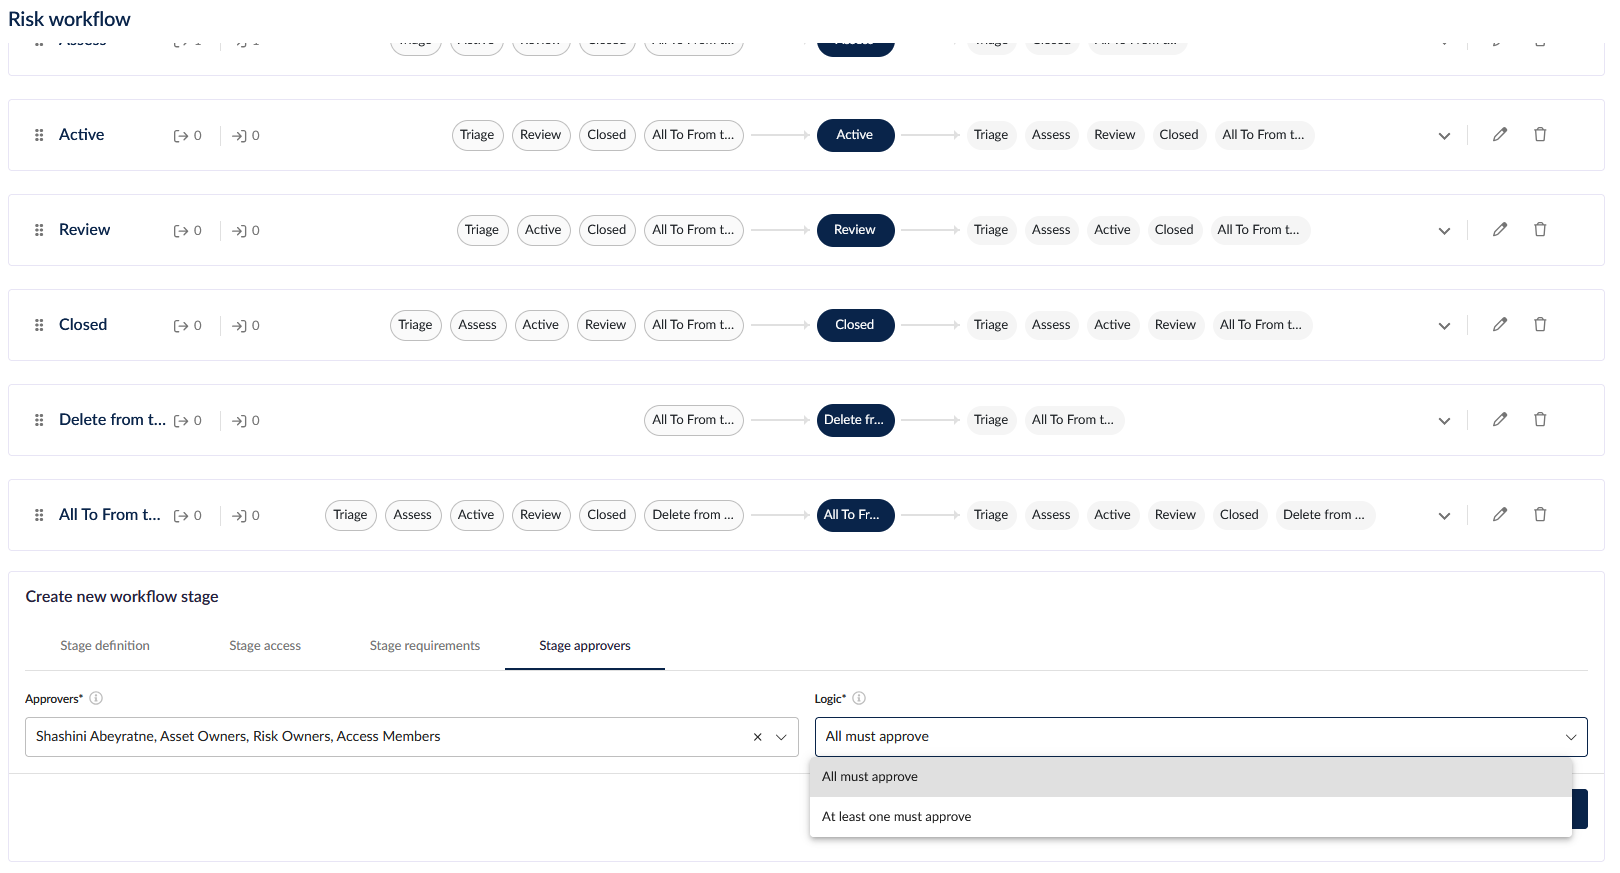
Flexible approvers and approval logic. On the Stage approvers tab, approvers can be individual users, groups or standard fields (Risk Owners or Access Members). Choose the logic for each stage: All approvers or At least one approver.
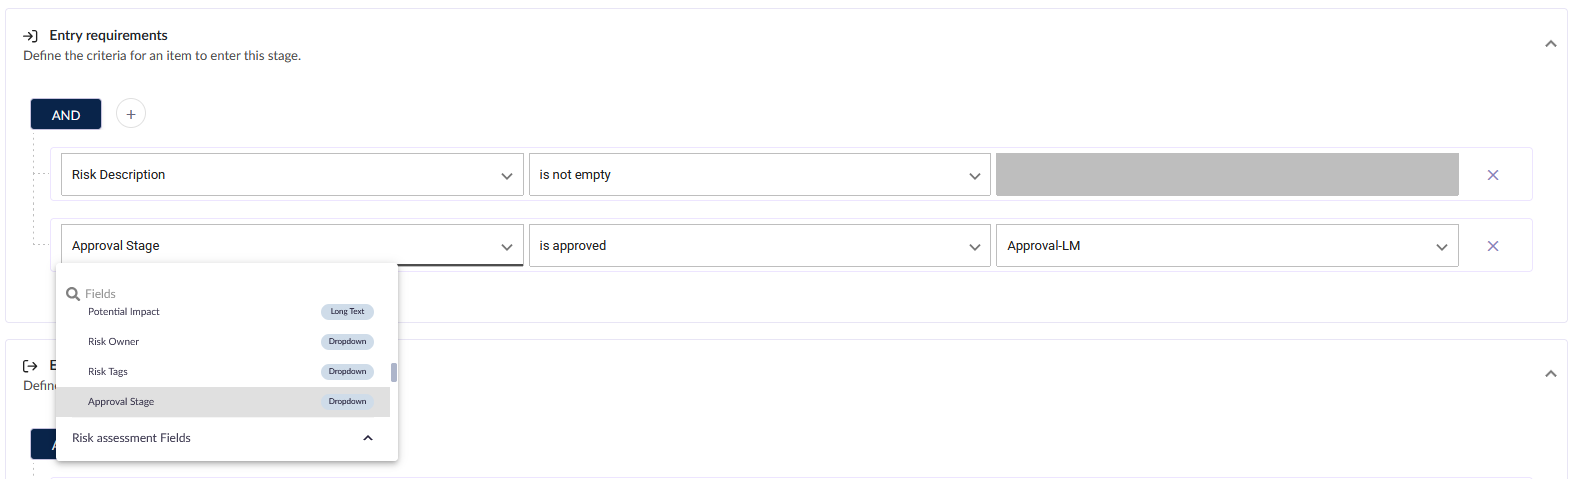
Approvals slot into your existing workflow. Standard stages now list approval stages as an option in their entry requirements (Enter from), grouped alongside standard stages. Add an approval stage to a standard stage's entry requirements to require sign-off before risks can enter it — this is how you connect the approval flow end to end.
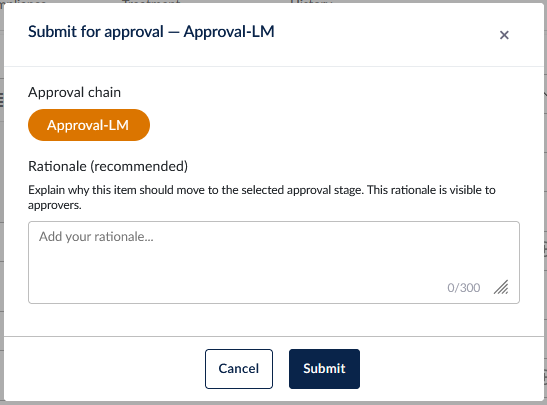
Submit with context. Moving a risk to an approval stage opens a Submit for approval dialog showing the approval chain ahead, with a rationale field so approvers see why the risk was submitted.
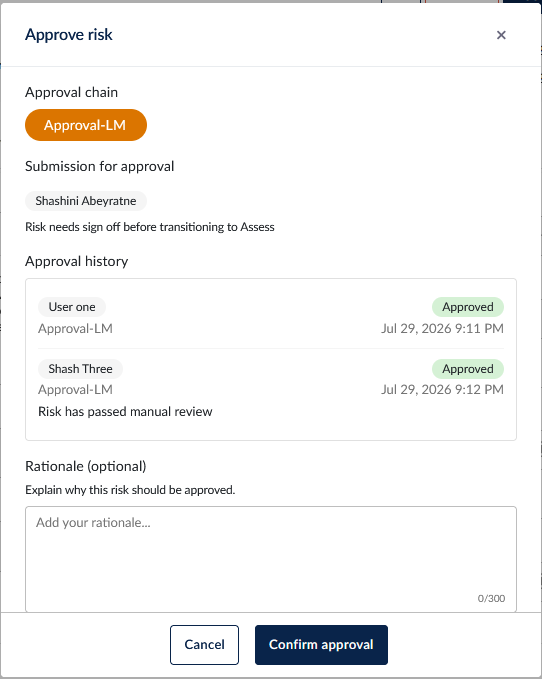
Approve or decline from the risk. Approvers see Approve and Decline buttons directly on the risk. The dialog shows the approval chain, the submitter's rationale, and the approval history to date. A reason is required when declining, and a single decline ends the approval immediately.
Automatic progression. Once the approval logic is satisfied, the risk automatically moves to the stage's configured destination — the next approval stage or back into the standard workflow. If an automatic transition is blocked due to exit requirements of the approval stage or entry requirements of the configured "Go to" stage, risk owners are notified so nothing stalls silently.
Cancel when plans change. Users with risk edit and workflow stage transition permissions can cancel a pending approval, returning the risk to the stage it came from. A cancellation reason is required.
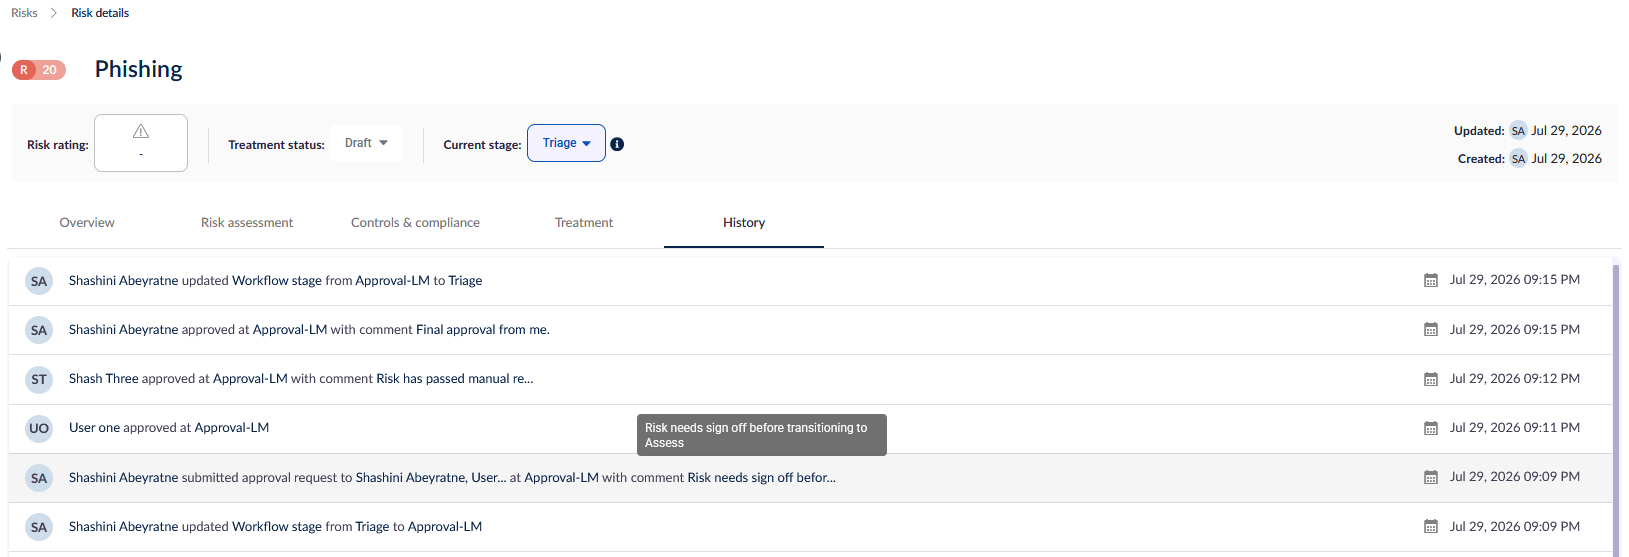
Full audit trail. Every submission, approval, decline, and cancellation is recorded on the risk's History tab, including who acted and when.
Notifications built in. Approvers and risk owners receive in-app and email notifications for approval requests, completions, cancellations, and blocked transitions. These can be managed under Notification management > Approvals.
How it works
Go to Administration > Risk workflow and select Create new workflow stage > Approval stage.
On the Stage approvers tab, choose your approvers and the approval logic.
Set the Go to destination — where the risk moves once approved.
On a risk, select the approval stage from the workflow stage dropdown, add a rationale, and select Submit.
Approvers action the request from the Approve / Decline buttons on the risk. Once the logic is met, the risk moves on automatically.
Good to know
Risk Approvals is available on all plans that include the risk workflow — no setup needed beyond creating your first approval stage.
Existing risks and workflows are unaffected. All current stages remain standard stages, and nothing changes until you add an approval stage.
While an approval is pending, the risk cannot leave the stage until the request is approved, declined, or cancelled.
Creating and editing approval stages uses your existing risk workflow stage permissions.
Head to your Risk workflow settings to add your first approval stage.
📖 Read more in the knowledge base: https://knowledgebase.6clicks.com/configuring-risk-workflow#approval
Functionality enhancements
Attachments can now be downloaded in bulk from the Risks Register
When importing users in bulk, a checkbox is now available to disable welcome emails
A session timeout can now be specified to improve security (Administration -> Settings -> Security)
Assessment responses now accept up to 5000 characters
Power BI dashboards
A Power BI Third Party (Vendor) Dashboard is now available for download (Administration -> Integrations -> Power BI)
Developer API enhancements
File attachments for various record types can now be retrieved from the Developer API
The GET Users endpoint can now return a list of permissions (add $expand=Permissions to the query)
API Keys can now be restricted to certain IP addresses or IP ranges. We encourage you to use IP restrictions whenever possible for an additional layer of security.
The “Set Value For” rule type now supports editable fields. You can choose whether auto-populated values remain read-only or can be updated by respondents during an assessment.
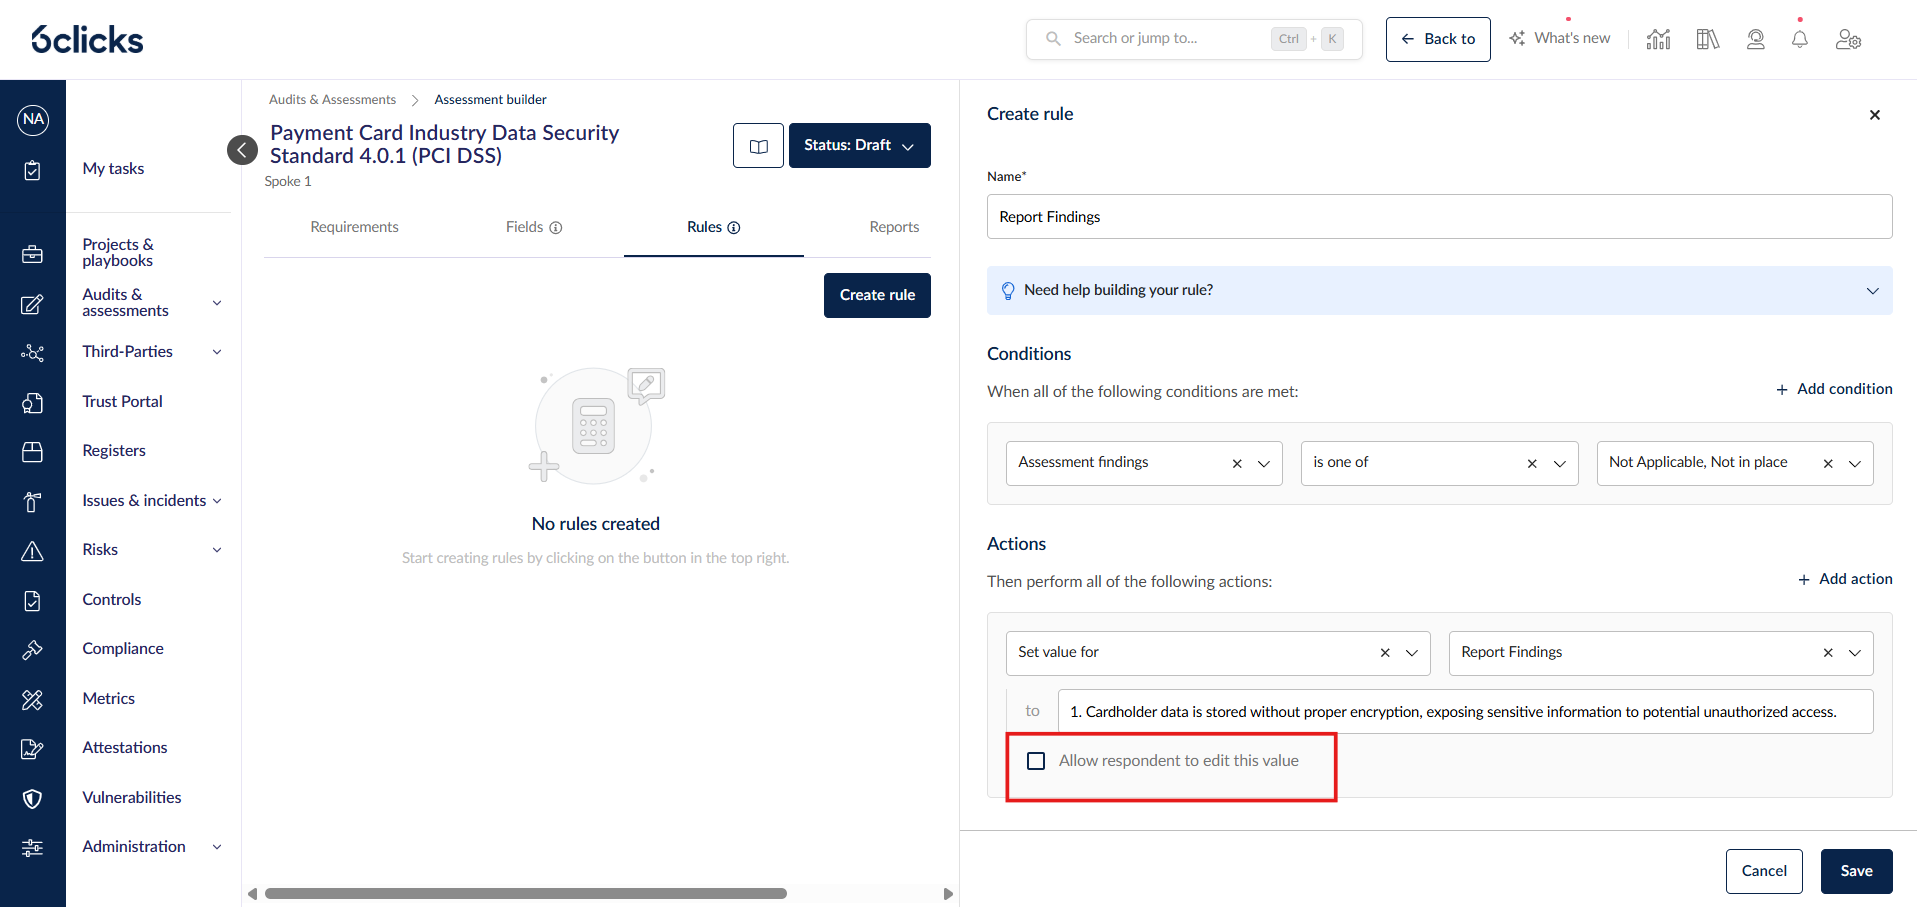
This option allows users to modify system-set values—supporting use cases like guided recommendation writing.
This setting is available during rule creation and applies based on the configured conditions, with safeguards in place to prevent rule conflicts.
Following the release of Advanced Report Templates for Requirement-Based Assessments (RBAs), this capability has now been expanded to Questionnaire-Based Assessments (QBAs), enabling more powerful and flexible report generation across all assessment types.
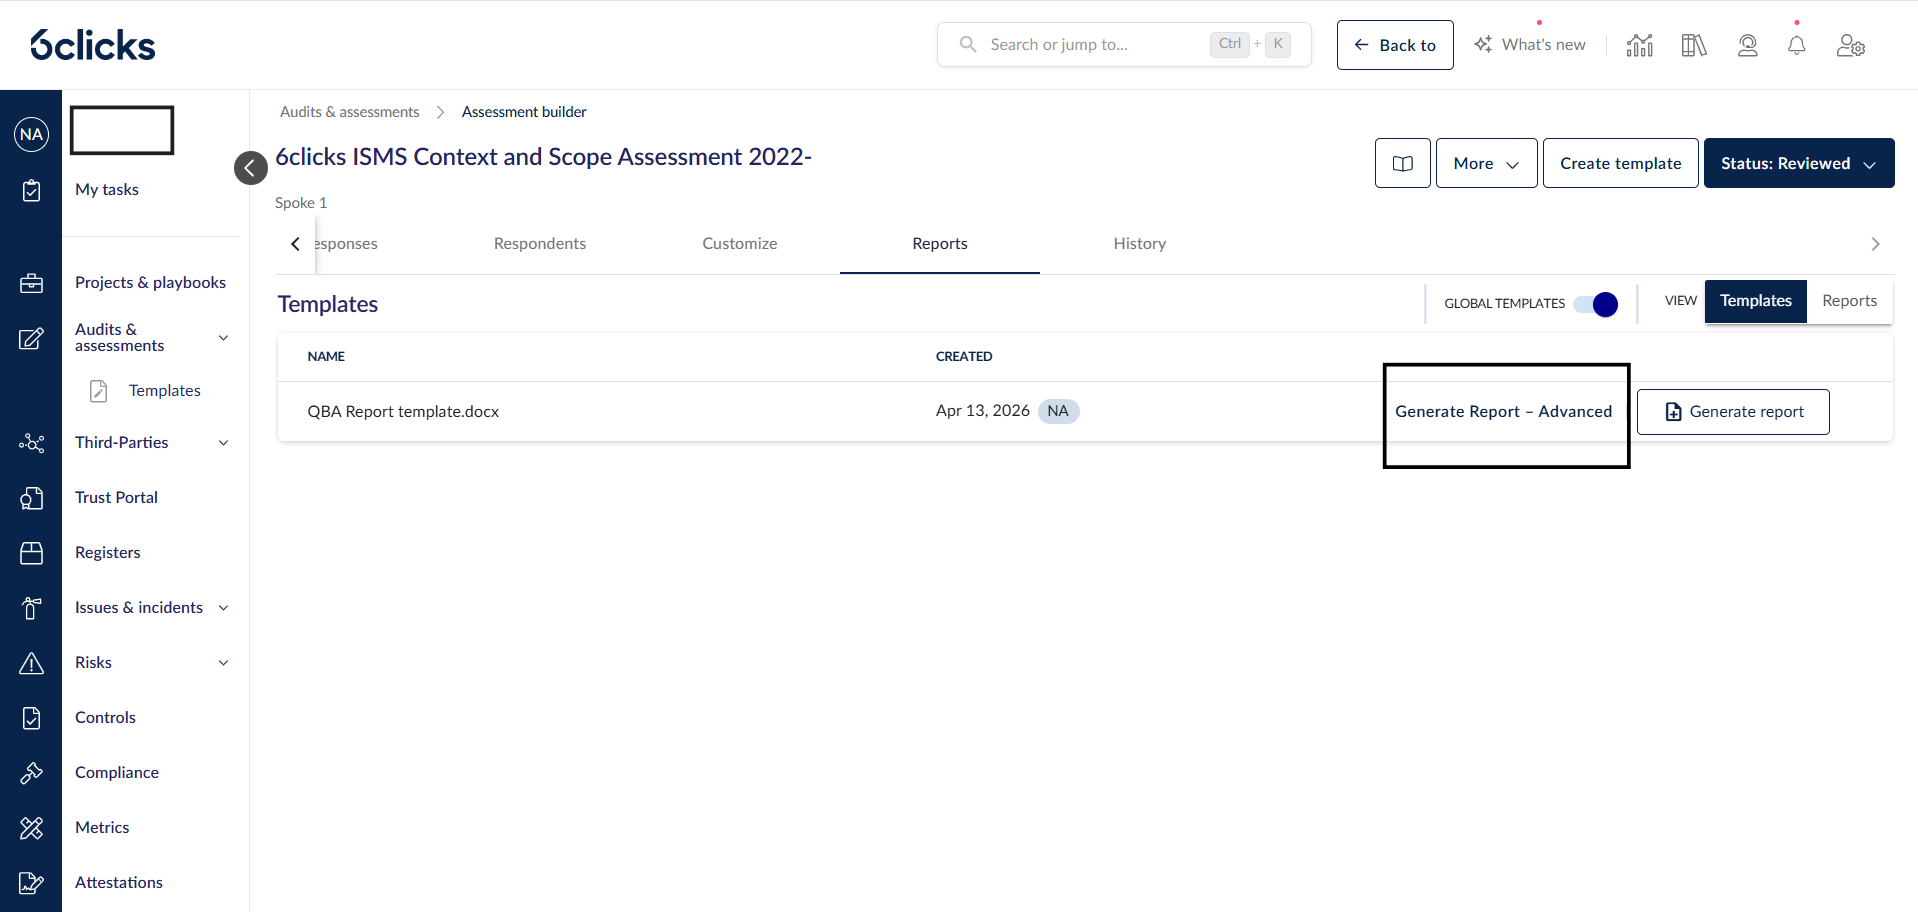
With this enhancement, reports can go beyond simple data population to dynamically shape outputs using conditions, structured logic, and calculations—making them more relevant, contextual, and insight-driven.
The platform continues to support existing tag-based placeholders alongside advanced placeholders, ensuring backward compatibility while unlocking greater customization.
Refer to the Knowledge Base to learn how to configure rule-based placeholders and make the most of this feature.
We’ve introduced Advanced Report Templates, enabling more powerful and flexible report generation for assessments.
With this enhancement, Assessment reports can go beyond simple data population to dynamically shape outputs based on conditions, structure, and calculations—making them more relevant and insight-driven.
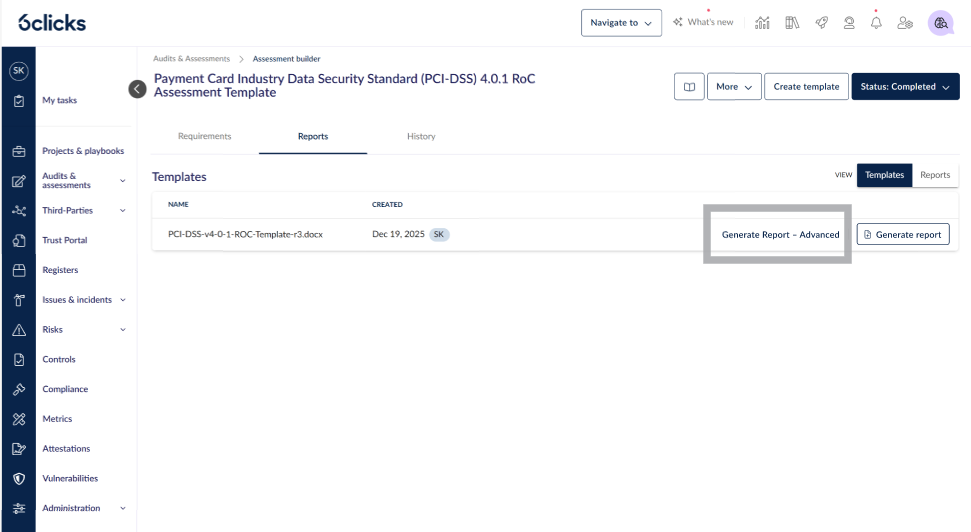
The application will continue to support existing tag-based placeholders alongside advanced placeholders. Refer to the Knowledge Base to learn how to configure rule-based placeholders.
Note:
This feature is currently available for requirement-based assessments (RBAs) and will be extended to Question based Assessments (QBAs) soon.
It is switched off by default as it will continue to be enhanced as a new feature. Please contact the Customer Success team to have it enabled for your environment.